
How to Test MOSFETs: A Comprehensive Guide
In this article, we’ve covered MOSFET basics, testing procedures, required equipment, and troubleshooting tips. Understanding MOSFETs is crucial for electronics enthusiasts. By testing them properly, we can ensure circuit reliability. Whether through in-circuit or out-of-circuit testing, accurate assessment is key. Identifying common faults like short circuits or gate oxide failure is essential for timely maintenance. Troubleshooting techniques, including checking gate voltage and inspecting the gate drive circuit, help address issues effectively. Now, let’s first understand what a MOSFET is!
What is the MOSFET?
A MOSFET (Metal-Oxide-Semiconductor Field-Effect Transistor) is a type of field-effect transistor that is widely used in electronic devices to amplify or switch electronic signals. It is a key component in modern electronics and is used for various applications such as amplification, switching, and voltage regulation. The MOSFET is a three-terminal device that consists of a gate, a source, and a drain. It is made up of a semiconductor material, typically silicon with a thin layer of insulating material known as the gate oxide on top. The gate oxide separates the gate terminal from the semiconductor material.
The operation of a MOSFET is based on the control of the flow of current through the semiconductor channel between the source and the drain terminals. By applying a voltage to the gate terminal, the conductivity of the channel can be controlled which allows the MOSFET to act as a switch or an amplifier. The MOSFET has ability to operate at high frequencies which makes it suitable for applications in radio frequency (RF) circuits and wireless communication systems.
Moreover, MOSFETs have a low power consumption making them energy-efficient and ideal for battery-operated devices. They also have a high input impedance, which means that they do not draw much current from the input signal source, making them less likely to distort the input signal. Another advantage of MOSFETs is their ability to handle high voltages and currents. This makes them suitable for power electronics applications, such as motor control, inverters, and power supplies. They can handle high power levels without significant loss or damage.
Equipment Needs for Testing MOSFET
Testing MOSFETs requires the use of specific equipment to ensure accurate measurements and reliable results. The multimeter, function generator, oscilloscope, power supply, breadboard, jumper wires, heat sink, and test leads are some of the essential tools needed for MOSFET testing. By having these equipment at your disposal, you can effectively analyze the behavior and performance of MOSFETs, enabling you to troubleshoot any issues and ensure their proper functioning in electronic circuits and devices.
Multimeter

A multimeter is a versatile tool that is a must-have for any electronics enthusiast or professional. When it comes to testing MOSFETs, a multimeter can be used to measure various parameters such as voltage, current, and resistance. It allows you to check the continuity of the MOSFET’s pins and verify if they are functioning as expected. Make sure to choose a multimeter with a high resolution and accuracy to obtain precise measurements.
Function Generator
A function generator is another essential tool for testing MOSFETs. It is used to generate different types of waveforms, such as sine, square, and triangular waves. By applying these waveforms to the MOSFET’s gate terminal, you can analyze its response and check if it is operating correctly. A function generator with adjustable frequency and amplitude settings is recommended for more comprehensive testing.
Oscilloscope

An oscilloscope is a vital tool for visualizing and analyzing electrical signals. It allows you to observe the voltage waveforms at different points in the circuit and diagnose any abnormalities or malfunctions. When testing MOSFETs, an oscilloscope can be used to monitor the gate, drain, and source voltages, providing valuable insights into their behavior. Look for an oscilloscope with a high bandwidth and sampling rate for accurate signal representation.
Power Supply
A reliable power supply is necessary for testing MOSFETs under different operating conditions. It provides the required voltage and current to the circuit, allowing you to simulate real-world scenarios. Make sure to choose a power supply with adjustable voltage and current limits to match the specifications of the MOSFET you are testing. This will enable you to evaluate its performance under various load conditions.
Breadboard and Jumper Wires
A breadboard and jumper wires are essential for creating temporary circuits and connections when testing MOSFETs. They provide a convenient platform for prototyping and allow you to quickly modify the circuit configuration. Use the breadboard to connect the MOSFET, resistors, capacitors, and other components as per the testing requirements. The jumper wires will help you establish the necessary connections between different points on the breadboard.
Heat Sink
When testing MOSFETs, especially high-power ones, it is crucial to dissipate the heat generated during operation. A heat sink helps in cooling the MOSFET, preventing it from overheating and potentially getting damaged. Choose a heat sink that is compatible with the MOSFET’s package and has sufficient thermal conductivity. Properly attaching the heat sink to the MOSFET is essential to ensure effective heat dissipation.
Test Leads and Probes
Test leads and probes are essential accessories for connecting the testing equipment to the MOSFET and other components. They provide a secure and reliable connection, minimizing the risk of inaccurate measurements or signal distortions. Make sure to use high-quality test leads and probes with proper insulation and shielding to maintain the integrity of the signals being measured.
Testing Procedure of the MOSFET
The testing procedure for a MOSFET involves several steps to determine its characteristics and functionality. Follow the steps below:
Step 1: Identify the MOSFET Pins
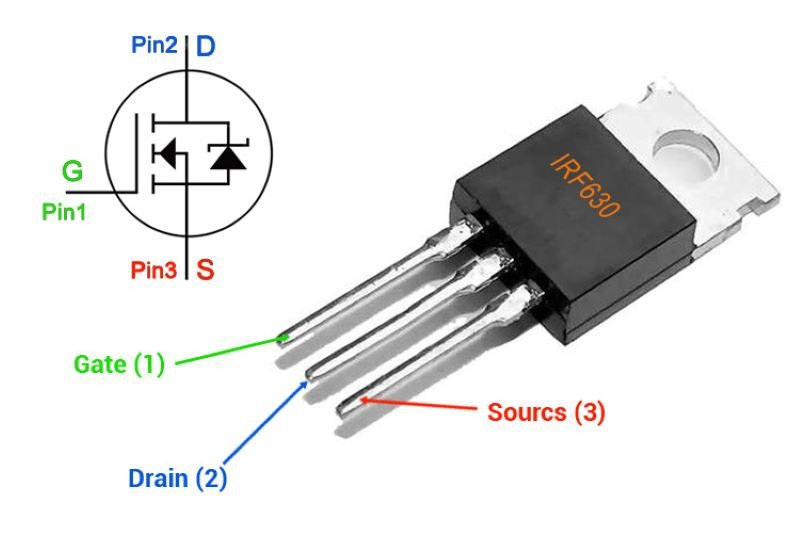
The first step is to identify the pins of the MOSFET. There are three main pins: the Gate (G), the Drain (D), and the Source (S). The Gate is the control pin, the Drain is the output pin, and the Source is the reference or ground pin. Refer to the datasheet of the MOSFET or consult the manufacturer’s documentation to identify the pin configuration.
Step 2: Set up the Test Circuit
Next, set up the test circuit on the breadboard or PCB. Connect the positive lead of the DMM to the Drain pin and the negative lead to the Source pin. Ensure that the DMM is set to the appropriate voltage measurement range.
Step 3: Test for Gate Threshold Voltage
In this step, we measure the Gate Threshold Voltage (Vth) of the MOSFET. Apply a voltage between the Gate and the Source pins by connecting the positive lead of the DMM to the Gate pin and the negative lead to the Source pin. Gradually increase the voltage and observe the DMM reading. The Vth is the voltage at which the MOSFET starts conducting.
Step 4: Test for Drain-Source Resistance
To test the Drain-Source Resistance (RDS), apply a known voltage between the Drain and the Source pins. Measure the current flowing through the MOSFET using the DMM in the appropriate current measurement range. Calculate the RDS using Ohm’s Law (RDS = VDS / ID), where VDS is the voltage across the Drain and the Source, and ID is the current flowing through the MOSFET.
Step 5: Test for Gate Leakage Current
Gate Leakage Current (IGL) is the current that flows through the Gate pin when the MOSFET is in the off state. To test for Gate Leakage Current, apply a small voltage between the Gate and the Source pins. Measure the current using the DMM in the appropriate current measurement range. A high Gate Leakage Current may indicate a faulty MOSFET.
Step 6: Test for Output Characteristics
To test the output characteristics of the MOSFET, apply different input voltages to the Gate pin while keeping the Drain-Source voltage constant. Measure the Drain current (ID) and the Drain-Source voltage (VDS) using the DMM. Plot the ID vs. VDS graph to visualize the behavior of the MOSFET.
MOSFET Testing In-Circuit Versus Out-of-Circuit
Both in-circuit testing and out-of-circuit testing have their advantages and disadvantages when it comes to testing MOSFETs. The choice between the two methods depends on various factors such as the complexity of the circuit, the availability of test equipment, and the specific requirements of the testing process.
Ultimately, the goal of MOSFET testing is to ensure the reliability and performance of the component. Whether you choose in-circuit testing or out-of-circuit testing, it is important to follow proper testing procedures and use appropriate test equipment to obtain accurate and reliable results.
In-Circuit Testing
In-circuit testing involves testing the MOSFET while it is still soldered onto the circuit board. This method is often preferred as it allows for testing the MOSFET in its actual working environment, providing a more accurate assessment of its performance. In-circuit testing can be done using a multimeter or a specialized MOSFET tester.
In-circuit testing offers the convenience of MOSFET testing without the hassle of desoldering/resoldering, saving time and effort. It enables simultaneous testing of other components for easier fault identification. Yet, its accuracy may be compromised by other circuit elements. Moreover, it may not detect certain faults requiring out-of-circuit testing.
Out-of-Circuit Testing
Out-of-circuit testing involves removing the MOSFET from the circuit board and testing it separately. This method allows for a more detailed and precise analysis of the MOSFET’s performance, as it eliminates any potential interference from other components or connections. Out-of-circuit testing is typically performed using specialized test equipment such as a transistor tester or a curve tracer. These devices provide more comprehensive testing capabilities, allowing for the measurement of various parameters such as voltage, current, and capacitance.
Choosing the Right Method
If accuracy and precision are the primary concerns, out-of-circuit testing may be the preferred choice. This method allows for a more detailed analysis of the MOSFET’s performance and can help identify subtle faults or defects that may go unnoticed through in-circuit testing. On the other hand, if convenience and efficiency are more important, in-circuit testing may be the better option. This method allows for testing the MOSFET in its actual working environment, saving time and effort by eliminating the need for desoldering and resoldering.
In some cases, a combination of both methods may be necessary. For example, in-circuit testing can be used for initial screening or quick assessments, while out-of-circuit testing can be employed for more detailed analysis or troubleshooting.
Common MOSFET Faults and How to Identify Them
Gate Oxide Failure:
- Symptoms: Excessive leakage current, erratic behavior, or gate-source leakage.
- Identification: Measure gate-to-source voltage (Vgs) and gate-to-drain voltage (Vgd). Any significant deviation from expected values indicates gate oxide failure.
Short Circuits:
- Symptoms: High drain current, overheating, or circuit malfunction.
- Identification: Measure resistance between drain and source (Rds) using a multimeter. A low resistance value indicates a short circuit.
Open Circuits:
- Symptoms: No current flow despite correct biasing, circuit failure.
- Identification: Measure resistance between drain and source. A high resistance value suggests an open circuit.
Thermal Runaway:
- Symptoms: Rapid temperature rise, increased drain current, potential damage to surrounding components.
- Identification: Monitor MOSFET temperature during operation. Sudden temperature spikes or excessive heat indicate thermal runaway.
Gate-to-Source or Gate-to-Drain Short:
- Symptoms: Unpredictable behavior, gate-source voltage deviations.
- Identification: Measure resistance between gate and source (Rgs) and gate and drain (Rgd). Any low resistance indicates a short.
Body Diode Failure:
- Symptoms: Reverse leakage current, unexpected conduction in reverse-biased condition.
- Identification: Test the MOSFET in reverse bias. If current flows in the reverse direction, it indicates a faulty body diode.
Excessive On-Resistance (Rds(on)):
- Symptoms: Increased voltage drop across the MOSFET, reduced efficiency.
- Identification: Measure drain-to-source voltage (Vds) and drain current (Id) during operation. Calculate Rds(on) using Ohm’s law. Higher than expected values indicate excessive on-resistance.
Gate Drive Issues:
- Symptoms: Insufficient gate voltage, slow switching speeds.
- Identification: Measure gate voltage during operation. Compare it with the recommended gate voltage. Any deviation suggests gate drive issues.
Troubleshooting MOSFETS
Before diving into troubleshooting, it is essential to identify whether the MOSFET is the root cause of the problem. Here are a few signs that indicate a potential MOSFET issue:
- The circuit is not functioning correctly.
- There is no output or distorted output.
- The MOSFET is getting excessively hot.
- There is a burning smell or visible damage to the MOSFET.
Troubleshooting Techniques
1. Check the Gate Voltage
The gate voltage is crucial for proper MOSFET operation. If the gate voltage is too low, the MOSFET may not turn on fully, resulting in increased resistance and potential overheating. On the other hand, if the gate voltage is too high, the MOSFET may become damaged. Use a multimeter to measure the gate voltage and ensure it is within the specified range.
2. Inspect the Gate Drive Circuit
The gate drive circuit provides the necessary voltage and current to control the MOSFET. Check for any loose connections, damaged components, or incorrect wiring in the gate drive circuit. Ensure that the gate drive circuit is properly designed and meets the requirements of the MOSFET being used.
3. Verify the Drain-Source Voltage
The drain-source voltage should be within the MOSFET’s specified limits. If the voltage exceeds the maximum rating, it can cause the MOSFET to fail. Measure the drain-source voltage using a multimeter and compare it to the MOSFET’s datasheet specifications.
4. Check for Short Circuits
A short circuit between the drain and source terminals can cause the MOSFET to malfunction or fail. Use a multimeter in diode mode to check for continuity between the drain and source terminals. If there is continuity, there may be a short circuit, and the MOSFET should be replaced.
5. Test the MOSFET in a Different Circuit
If possible, test the MOSFET in a different circuit to isolate whether the issue is with the MOSFET itself or the surrounding components. This can help determine if the MOSFET needs to be replaced or if there are other factors contributing to the problem.
6. Consider Thermal Management
MOSFETs generate heat during operation, and excessive heat can lead to performance issues or failure. Ensure that the MOSFET is adequately cooled and that any heat sinks or thermal management techniques are correctly implemented. Excessive heat can be a sign of incorrect circuit design, insufficient cooling, or overloading of the MOSFET.
Conclusion
In conclusion, MOSFETs continue to be indispensable components in modern electronics, driving innovation and powering a vast array of applications. Understanding their basics, testing methods, and how to troubleshoot issues equips us to handle electronic projects and maintain gadgets effectively in today’s ever-evolving tech world.