Why KVM VPS Is the Right Choice for Projects with Custom Server Configurations
Quick Summary
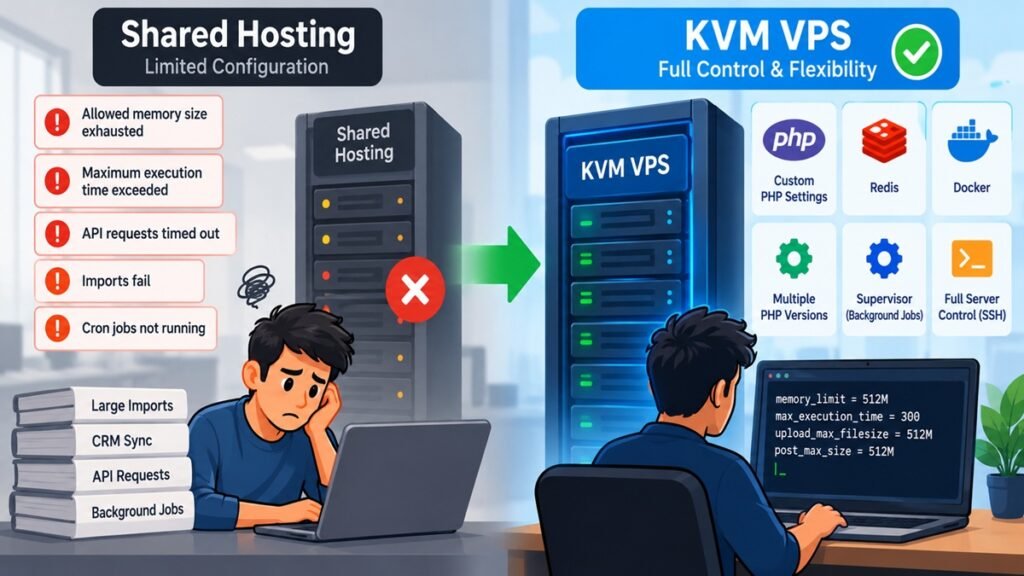
Many businesses move to a KVM VPS not because they need more CPU or RAM, but because their hosting environment has become the limiting factor. An online store requires a higher memory_limit for large imports, a Laravel application needs Redis and Supervisor, developers want Docker, or different applications require different PHP versions. On shared hosting, these changes are often restricted or unavailable.
The problem is rarely a lack of server resources. More often, the infrastructure no longer matches the application’s requirements. Imports fail, CRM synchronisation stops, API requests time out, and developers spend time working around hosting limitations instead of improving the product.
A KVM VPS removes these restrictions by giving full control over the operating environment. PHP settings, Redis, Docker, background workers, multiple PHP versions and additional system packages can be configured directly on the server, allowing the infrastructure to grow alongside the application instead of limiting it.
How to Tell When Standard Hosting Limits Are Holding Your Project Back
Many businesses start looking for a more powerful hosting plan only after the website becomes noticeably slower. In many cases, however, CPU or RAM are not the real problem. The application has simply reached the limits of the hosting environment. Product imports stop halfway through, CRM synchronisation fails, API requests time out, and backups or reports take much longer than expected. When support explains that PHP limits or server settings cannot be changed on a shared platform, it becomes clear that the infrastructure—not the application—is the bottleneck.
Start by identifying which limit is being reached. Connect via SSH or open the PHP error log and look for messages such as:
Allowed memory size exhausted Maximum execution time exceeded upstream timed outThese errors indicate different problems: insufficient PHP memory, scripts exceeding the execution time limit, or requests taking too long for the web server to complete.
If your application uses APIs, background queues or scheduled synchronisation, check their logs as well and confirm that tasks finish successfully rather than terminating because of execution limits.
Next, verify the current PHP configuration:
php -i | grep memory_limit php -i | grep max_execution_timeIf the site is already running, compare these values with the output of a temporary phpinfo() page.
Then compare the limits with the actual workload. Default PHP settings are usually sufficient for a corporate website, but large product imports, CRM or ERP synchronisation, bulk CSV processing and report generation often require significantly higher limits.
Review background processing separately. Check cron logs, Laravel queues, Supervisor or the application’s task history. If jobs repeatedly restart, remain queued or never complete, the server is unable to process them within the current limits.
Do not assume the application simply needs optimisation. Even well-written software cannot finish processing if every request is terminated after 30 seconds or runs out of memory. At that point, the restriction is no longer the code but the hosting environment.
If the logs consistently show Allowed memory size exhausted, Maximum execution time exceeded, upstream timed out, failed cron jobs, API timeouts or incomplete imports, the project has most likely outgrown standard shared hosting. A fully configurable KVM VPS allows PHP, PHP-FPM, background workers and other services to be tuned around the application’s requirements instead of fixed hosting limits.
How to Adjust PHP Settings for a Large E-commerce Store
An online store may run smoothly for months until the catalogue grows. Product imports begin stopping halfway through, stock synchronisation fails, reports take much longer to generate, and administrators are left with a blank page or timeout errors. Although this often looks like a hardware limitation, the real bottleneck is frequently PHP configuration.
Start by identifying which limit is causing the failure. Locate the active php.ini file or the PHP-FPM pool configuration and review memory_limit, max_execution_time, max_input_vars, post_max_size and upload_max_filesize. These settings are the most common reason large CSV or XML imports, bulk product updates and long-running requests fail. Increase only the limit that is actually being reached rather than raising every value unnecessarily.
Then consider the workload itself. Importing a few hundred products requires very different settings from importing tens of thousands of products with images, prices and stock levels. For large catalogues, processing data in smaller batches through cron jobs or queue workers is often more reliable than handling everything in a single PHP request.
Avoid setting excessively high limits without considering available resources. Large memory_limit values combined with too many PHP-FPM workers can exhaust server RAM, trigger swapping and slow down the entire website. PHP settings should always be balanced with the server’s memory and PHP-FPM configuration.
After making changes, restart PHP-FPM:
sudo systemctl restart php-fpmOn systems with version-specific services:
sudo systemctl restart php8.3-fpmRepeat the import or synchronisation task and check the PHP-FPM logs. The following errors should no longer appear:
Allowed memory size exhausted Maximum execution time exceeded upstream timed outIf slow logging is enabled, verify that long-running scripts now complete within an acceptable time instead of appearing repeatedly in the slow log.
The configuration can be considered successful when imports and synchronisation complete without interruption, reports finish within the expected time, and PHP-FPM no longer records memory exhaustion or timeout errors. Only after eliminating these configuration limits does it make sense to determine whether additional CPU, RAM or faster storage is actually required.
How to Configure a Separate PHP-FPM Pool for One Website
When several websites share the same VPS, performance problems often begin when one application starts consuming most of the available PHP workers. An online store imports products, a Laravel application processes queues, or a CRM generates reports, while other websites suddenly become much slower. Although the server appears overloaded, the problem is often limited to a single PHP-FPM pool.
Create a separate PHP-FPM pool for each important project. Assign a dedicated user and group, configure an individual socket or TCP port, and set appropriate values for pm.max_children, pm.start_servers, pm.min_spare_servers, pm.max_spare_servers and pm.max_requests. For resource-intensive applications, enable slowlog and configure request_slowlog_timeout to identify long-running scripts.
Separate pools isolate applications from one another. If an online store temporarily uses all workers in its own pool, a corporate website, CRM or API can continue serving requests. Separate pools also simplify troubleshooting because each application has its own error and slow logs.
Avoid setting process limits without considering available RAM. If every pool is allowed too many workers, multiple websites can exhaust server memory simultaneously, forcing the system to swap and reducing overall performance. pm.max_children should always be calculated according to available memory and the expected workload.
After saving the configuration, restart PHP-FPM and verify that the new pool has loaded correctly. Generate several requests and confirm that PHP-FPM processes are running under the correct user using ps or the PHP-FPM status page. Check the slow log to ensure that only genuinely long-running scripts are recorded.
The configuration is complete when each website runs in its own PHP-FPM pool, processes use the correct user, the slow log records only the intended application, and heavy activity on one project no longer slows down the others. This makes performance tuning and troubleshooting much easier while improving resource isolation across the server.
How to Configure Redis or Memcached to Reduce MySQL Load
As a website grows, slow performance is often blamed on limited CPU or storage. In many cases, however, the database is simply executing the same SQL queries repeatedly. Product catalogues load slowly, filters rebuild identical result sets, the admin panel becomes sluggish, and TTFB increases despite relatively low traffic. These are typical signs that object caching has not been enabled.
Start by checking whether Redis or Memcached is installed and running:
systemctl status redisor
systemctl status memcachedIf the service is missing, install it using your distribution’s package manager and enable it to start automatically after reboot.
Next, configure the application to use object caching. In WordPress, install and activate Redis Object Cache. In Laravel, configure Redis in the .env file and clear the configuration cache. Other CMS platforms and frameworks should be configured to use Redis or Memcached instead of the default file-based cache.
Do not assume the configuration is complete simply because the service is running. Redis must actually store and serve cached objects. Otherwise the application will continue sending every request directly to MySQL.
Keep in mind that Redis is not a replacement for query optimisation. It cannot fix inefficient SQL or poorly written code, but it can eliminate thousands of repeated queries by serving cached data directly from memory. For online stores, CRM systems, forums and other dynamic applications, this often reduces MySQL load significantly and improves page generation times.
Verify the configuration by running:
redis-cli pingThe expected response is:
PONGThen check Redis statistics or your cache plugin dashboard. The number of cached keys and the cache hit rate should increase during normal website activity.
Finally, compare performance before and after enabling object caching. Measure TTFB, review the number of SQL queries with Query Monitor or a similar profiler, and test the same catalogue and admin pages. If repeated queries decrease, page generation becomes faster and TTFB is more consistent, Redis or Memcached is actively reducing MySQL load rather than simply running as another background service.
How to Run Different PHP Versions for Subdomains on the Same Server
It is common for the main website to support PHP 8.3 while an older CRM, client portal or legacy application still depends on PHP 7.4 or 8.0. There is no need to keep the entire server on an outdated PHP version. On a KVM VPS, each application can run its own PHP version through a dedicated PHP-FPM pool.
Start by identifying which domains require different PHP versions, then install the necessary PHP-FPM packages. Verify that each service is running:
systemctl status php8.3-fpm systemctl status php8.0-fpmBoth services should report active (running) before you continue.
Create a separate PHP-FPM pool for each application with its own user, group and socket. Separate pools improve security, simplify troubleshooting and prevent one application’s configuration from affecting another.
Next, configure each Nginx virtual host to use the correct PHP-FPM socket through the fastcgi_pass directive. Installing multiple PHP versions alone has no effect if Nginx still points every website to the same socket.
Before applying the changes, validate the configuration:
nginx -tIf no errors are reported, restart Nginx and the required PHP-FPM services:
systemctl restart nginx systemctl restart php8.3-fpm systemctl restart php8.0-fpmVerify the configuration with a temporary phpinfo() page in each document root. Confirm that the main website reports PHP 8.3 and the CRM reports PHP 8.0, then delete the test files immediately because phpinfo() exposes detailed server information.
Finally, review the PHP-FPM logs. If problems remain, they usually point to an incorrect socket, missing PHP extensions, permission issues or application compatibility.
The configuration is complete when every subdomain uses the intended PHP version, nginx -t passes successfully, all PHP-FPM services are running, and the logs contain no socket, permission or extension errors. This approach allows you to upgrade individual applications gradually instead of delaying updates for the entire server because of one legacy system.
How to Verify That Your Custom Server Configuration Actually Improved Performance
After increasing PHP limits, enabling Redis, tuning PHP-FPM or moving long-running jobs to cron, many administrators assume the problem has been solved. In reality, the only reliable way to confirm this is by comparing measurable results before and after the changes.
Start by recording a baseline. Measure the TTFB of the same page, note how long a product import, CRM synchronisation or backup takes, and, for WordPress, record the number of SQL queries and page generation time using Query Monitor. Most other CMS platforms and frameworks provide similar profiling tools or application logs.
After applying the changes, repeat exactly the same test using identical conditions. Compare the same page, the same import file and the same workload to produce meaningful results.
While the test is running, monitor the server:
topor
htopIf the sysstat package is installed, also run:
iostat -x 1 vmstat 1Watch for excessive I/O wait, swap usage or PHP processes that continue running long after others have finished. These often reveal bottlenecks that are not visible from the application itself.
When the test completes, review the logs:
journalctl -u php-fpm -n 100 tail -100 /var/log/nginx/error.logIf you use MariaDB, check both the server log and the slow query log. After enabling Redis, compare the number of slow queries with the baseline to confirm that repeated database activity has decreased.
If background processing has been moved to cron or Supervisor, verify that scheduled jobs complete successfully:
journalctl -u cron -n 50supervisorctl statusJobs should finish normally without repeated restarts, timeouts or memory exhaustion.
When using Redis, confirm that the application is actually using the cache:
redis-cli info statsThe keyspace_hits counter should steadily increase. If cache hits remain low, the application is probably still querying MySQL directly.
Finally, compare the results. Check whether imports complete faster, SQL queries have decreased, TTFB is more consistent, timeout and memory errors have disappeared, pm.max_children is no longer saturated, swap usage remains low and iowait does not increase during heavy workloads.
The optimisation is successful only if these metrics improve together. If one value improves while others remain unchanged or become worse, further tuning is still required. Measuring every change allows you to identify which configuration adjustments produced real performance gains instead of relying on assumptions.
How to Choose a vds kvm linux Platform for Projects with Custom Requirements
Once PHP has been tuned, Redis enabled and background processing configured, it usually becomes clear that hardware specifications are only part of the picture. The more important question is whether the server can adapt as the application evolves. If every new requirement depends on your hosting provider or runs into platform restrictions, even a powerful VPS will eventually become a bottleneck.
Before choosing a vds kvm linux server, think beyond today’s workload. A WordPress website may later require Redis, Docker, background queues, API integrations or a dedicated Node.js service. Choosing a platform that supports these technologies from the start is usually far easier than rebuilding the infrastructure after the project has grown.
The next step is to verify how much control the server provides. Make sure you can install multiple PHP versions, create separate PHP-FPM pools, deploy Redis or Memcached, run Supervisor and Docker, modify php.ini, configure your own firewall, install additional packages and manage Linux services without provider intervention.
Scalability is just as important. Check that CPU, RAM and storage can be upgraded without migrating to a new server. As databases, integrations and background workloads grow, expanding existing infrastructure is usually more valuable than saving a small amount on the cheapest VPS plan.
Before ordering, confirm that the platform supports your current and future PHP versions, all required software, custom firewall rules, cron jobs, background workers and separate PHP-FPM pools. Also make sure the available resources are sufficient not only for the website, but also for the database, object cache, scheduled tasks and future growth.
A well-chosen vds kvm linux platform is defined not by the number of CPU cores in the pricing table, but by how easily it can adapt to changing requirements. Providers such as Era.Host, built on fully isolated KVM virtualisation, allow projects to add services, upgrade components and scale resources without rebuilding the server environment. In practice, this means you only need a larger server when the project genuinely outgrows its available resources—not because the platform itself has become the limitation.