Make Your Own Air Mouse with IndusBoard Coin
Ever imagined controlling your computer or smart TV with just a wave of your hand? With an air mouse, you can do exactly that. In this project, we’ll show you how to create your own air mouse using the IndusBoard Coin—a tiny yet powerful development board loaded with sensors.
What is an Air Mouse?
An air mouse is a device that allows you to control the cursor on a screen by moving the device in the air. It’s perfect for presentations, gaming, or just a fun DIY project. The key component in this setup is the accelerometer sensor, which detects the orientation and movement of the device.
Components Required
Here’s what you’ll need to build your air mouse:
| S. No. | Name | Description | Quantity |
|---|---|---|---|
| 1 | IndusBoard Coin | 3cm sized dev board | 1 |
| 2 | Device (laptop) | A Laptop or other mouse-operated device | 1 |
| 3 | USB cable | To connect IndusBoard to the device | 1 |
| 4 | Push button | For left and right click | 2 |
| 5 | Jumper wires | To connect push buttons to the board | 3 |
How It Works
The IndusBoard Coin comes equipped with various built-in sensors, including an accelerometer and a magnetometer. For this project, we’ll be using the accelerometer to detect the board’s orientation and translate it into mouse movements. Additionally, two push buttons will be used to simulate left and right mouse clicks.
Arduino Code
Below is the Arduino code that will bring your air mouse to life:
#include <LSM303AGR_ACC_Sensor.h>
#include <Wire.h>
#include <MPU6050.h>
#include "USB.h"
#include "USBHIDMouse.h"

USBHIDMouse Mouse;
MPU6050 mpu();

#if defined(ARDUINO_SAM_DUE)
#define DEV_I2C Wire1 //Define which I2C bus is used. Wire1 for the Arduino Due
#define SerialPort Serial
#else
#define DEV_I2C Wire //Or Wire
#define SerialPort Serial
#endif

LSM303AGR_ACC_Sensor Acc(&DEV_I2C);

const int leftButtonPin = 2; // Pin connected to the left button
const int rightButtonPin = 3; // Pin connected to the right button

void setup() {
Serial.begin(115200);
Mouse.begin();
USB.begin();
Wire.begin();

DEV_I2C.begin();
Acc.begin();
Acc.Enable();

pinMode(leftButtonPin, INPUT_PULLUP);
pinMode(rightButtonPin, INPUT_PULLUP);
}

void loop() {
int32_t accelerometer[3];
Acc.GetAxes(accelerometer);

float accelX = accelerometer[0]; // X-axis
float accelY = accelerometer[1]; // Y-axis

float mouseX = (float)(accelX * 0.01); // Adjust scaling factor as needed
float mouseY = (float)(accelY * 0.01); // Adjust scaling factor as needed
Mouse.move(mouseX, mouseY);

int leftButtonState = digitalRead(leftButtonPin);
int rightButtonState = digitalRead(rightButtonPin);

if (leftButtonState == LOW) {
Mouse.click(MOUSE_LEFT); // Send left click
delay(50); // Debounce delay
}
if (rightButtonState == LOW) {
Mouse.click(MOUSE_RIGHT); // Send right click
delay(50); // Debounce delay
}

if (abs(mouseX) > 2 || abs(mouseY) > 2) { // Adjust threshold as needed
Mouse.move(mouseX, mouseY);
}
delay(20); // for smooth movement
}
Schematic and Real Implementation
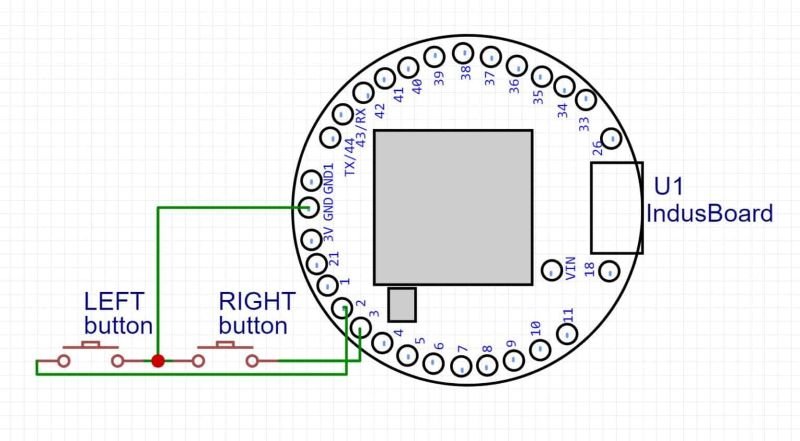
To bring everything together, follow the schematic below to connect your push buttons to the IndusBoard Coin:
- Connect the left button to pin 2 of the IndusBoard.
- Connect the right button to pin 3.
- Use the jumper wires to make the connections, ensuring everything is securely attached.
Once your hardware is set up, upload the code to your IndusBoard, connect it to your computer via USB, and watch as your hand movements control the cursor on the screen!
Conclusion
In conclusion, Building your own air mouse is not only a fun project but also a practical tool that can be used in a variety of settings. With the IndusBoard Coin and some basic components, you can create a device that’s both innovative and useful. Give it a try and see how you can take control of your devices with just a wave of your hand!