How to Create an Altimeter and Weather Station with ESP32 and BME280
This project uses the BME280 sensor module, known for its accuracy and versatility in measuring altitude, temperature, humidity, and pressure, combined with the ESP32 microcontroller, a powerful, Wi-Fi-enabled board popular in IoT projects.
The goal of this project is to build a simple and efficient altimeter and environmental monitoring system using the BME280 sensor and ESP32, capable of capturing real-time data and displaying it. The setup is ideal for projects that require monitoring of environmental conditions, altitude adjustments, or basic weather predictions, demonstrating how powerful yet affordable components can be in DIY IoT solutions.
Components Required
To get started with this project, you’ll need the following components and tools:
- BME280 Sensor
The BME280 is a compact sensor capable of measuring atmospheric pressure, humidity, and temperature, which allows for precise altitude calculations based on pressure data. - ESP32 Microcontroller
The ESP32 board will serve as the main processor, handling data from the BME280 and communicating the sensor data. With built-in Wi-Fi, it also allows for future possibilities such as sending the data to a remote server or IoT dashboard. - Jumper Wires, Breadboard, or Other Assembly Components
These are essential for connecting the BME280 sensor to the ESP32. A breadboard can be useful for prototyping, but direct soldering or use of connectors may be preferred for a more permanent setup. - Power Source
ESP32 can be powered via USB, battery, or external power supplies, depending on your setup. - Additional Tools and Software
- Arduino IDE
The Arduino IDE is a user-friendly development platform compatible with ESP32. It allows us to write, upload, and test code directly on the ESP32. The IDE also provides a serial monitor to view real-time sensor data. - BME280 Library and ESP32 Board Package
To simplify the programming process, install the BME280 sensor library and the ESP32 board package in the Arduino IDE. This will allow easy access to functions that fetch data from the sensor and control the ESP32.
- Arduino IDE
Understanding the BME280 Sensor
The BME280 is an integrated environmental sensor designed for accurate measurement of altitude, temperature, humidity, and atmospheric pressure, making it ideal for both indoor and outdoor applications. Let’s break down its capabilities:
- Measurement Capabilities
- Altitude: By measuring atmospheric pressure, the BME280 can calculate altitude using barometric formulas, which makes it useful for determining elevation or changes in altitude.
- Temperature: The sensor provides temperature readings with high accuracy, which is important for weather applications and monitoring temperature-sensitive environments.
- Humidity: The humidity measurement feature allows for accurate readings of relative humidity, useful in climate monitoring and environmental control applications.
- Atmospheric Pressure: By capturing the pressure, the BME280 helps in assessing weather conditions and forecasting changes, as pressure tends to drop before rain and rise in fair weather.
- How the BME280 Works
The BME280 is a MEMS (Micro-Electro-Mechanical Systems) sensor that leverages changes in a tiny membrane within the sensor when exposed to environmental conditions. The sensor measures variations in pressure, temperature, and humidity through this mechanism and converts them into digital data. The data is then processed internally, providing precise readings that can be used in various applications. - Technical Specifications
- Temperature Range: -40°C to +85°C with an accuracy of ±1°C.
- Humidity Range: 0% to 100% with an accuracy of ±3%.
- Pressure Range: 300 to 1100 hPa with an accuracy of ±1 hPa.
- Interface: Communicates via I2C or SPI, making it compatible with ESP32 and other microcontrollers.
Setting Up the ESP32 with BME280
To begin with the setup, follow these instructions to connect the BME280 sensor to the ESP32 microcontroller. The BME280 sensor can be wired to the ESP32 using either I2C or SPI communication; here, we’ll use the I2C interface for simplicity.
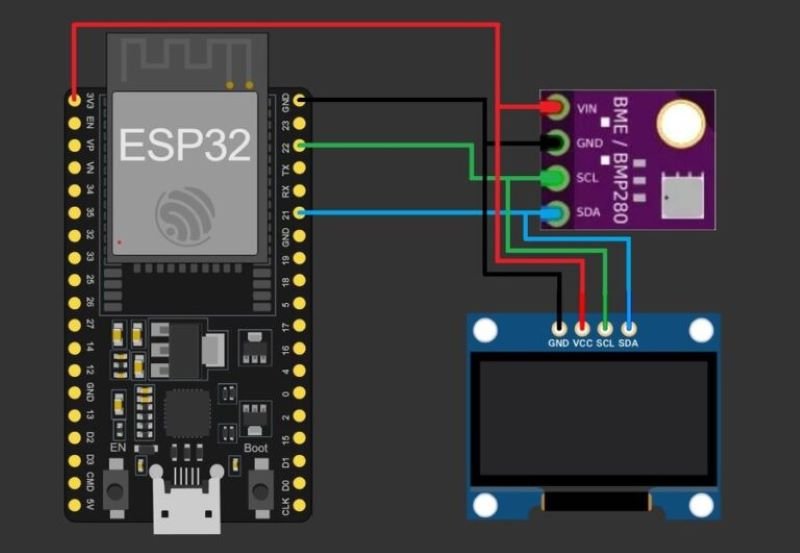
Wiring Instructions
- BME280 to ESP32 connections (using I2C):
- VCC (BME280) to 3.3V (ESP32)
- GND (BME280) to GND (ESP32)
- SCL (BME280) to GPIO 22 (ESP32)
- SDA (BME280) to GPIO 21 (ESP32)
Note: Ensure you connect the sensor to the 3.3V pin on the ESP32, as the BME280 operates at 3.3V and may be damaged by 5V.
Diagram of the Circuit Connections
Tips for Secure Connections
- Use Proper Jumper Wires: Ensure that the jumper wires fit snugly, particularly if using a breadboard.
- Stable Breadboard Setup: A loose connection can lead to fluctuating or inaccurate readings. For a more permanent setup, consider soldering the connections.
- Double-check Ground Connections: A proper ground connection is essential for accurate sensor readings.
Programming the ESP32
With the hardware connected, let’s move on to programming the ESP32 to read data from the BME280 sensor. We’ll use the Arduino IDE for this step.
#include <Wire.h>
#include <Adafruit_Sensor.h>
#include <Adafruit_BME280.h>

// Define I2C address for BME280
#define SEALEVELPRESSURE_HPA (1013.25)

// Create BME280 object
Adafruit_BME280 bme;

void setup() {
Serial.begin(115200);

// Initialize the BME280 sensor
if (!bme.begin(0x76)) {
Serial.println("Could not find BME280 sensor!");
while (1);
}
}

void loop() {
// Fetch data from BME280
float temperature = bme.readTemperature();
float humidity = bme.readHumidity();
float pressure = bme.readPressure() / 100.0F; // hPa
float altitude = bme.readAltitude(SEALEVELPRESSURE_HPA);

// Print data to Serial Monitor
Serial.print("Temperature: ");
Serial.print(temperature);
Serial.println(" °C");

Serial.print("Humidity: ");
Serial.print(humidity);
Serial.println(" %");

Serial.print("Pressure: ");
Serial.print(pressure);
Serial.println(" hPa");

Serial.print("Altitude: ");
Serial.print(altitude);
Serial.println(" meters");

delay(2000); // Delay 2 seconds before next reading
}
Libraries Required
- BME280 Library: Install the Adafruit BME280 library from the Arduino Library Manager. This library simplifies reading data from the BME280.
- ESP32 Board Package: Install the ESP32 board package in Arduino IDE. This allows you to compile and upload code to the ESP32.
Step-by-Step Code for Interfacing BME280 with ESP32
Below is a sample code to read altitude, temperature, humidity, and pressure from the BME280 sensor and print it on the serial monitor.
Explanation of Key Parts of the Code
- Data Acquisition from BME280: The
bme.readTemperature(),bme.readHumidity(),bme.readPressure(), andbme.readAltitude()functions fetch data from the BME280 sensor. - Altitude Calculation: The
bme.readAltitude()function uses the current pressure and standard sea-level pressure to calculate the altitude. - Temperature and Humidity Readings: The code also reads temperature and humidity, displaying them in the serial monitor.
Example Output Display
Upon running the code, you should see output like this in the serial monitor:
Temperature: 25.6 °C
Humidity: 45.3 %
Pressure: 1012.5 hPa
Altitude: 152.3 meters
Testing and Calibration
After uploading the code, it’s essential to test the sensor’s accuracy and make any necessary calibrations for altitude.
Instructions for Testing the Sensor’s Accuracy
- Open Serial Monitor: After uploading the code, open the Serial Monitor in the Arduino IDE to view real-time readings from the sensor.
- Verify Readings: Check if the readings for temperature, humidity, and altitude match known values in your environment.
- Comparison Test: Compare sensor readings with another known device, such as a reliable barometer or temperature sensor, to check accuracy.
Tips on Calibrating Altitude Readings
- Adjust Sea-Level Pressure: If you notice altitude discrepancies, adjust the SEALEVELPRESSURE_HPA variable to the average sea-level pressure of your location for higher accuracy.
- Stable Environment: Make sure the sensor is in a stable environment without sudden temperature or pressure changes during calibration, as this can affect readings.
Troubleshooting Common Issues
- No Response from BME280: If the sensor doesn’t respond, check the I2C address. Some BME280 modules use
0x77instead of0x76. - Incorrect Temperature or Humidity: Ensure the sensor is not placed near heat sources or in a humid environment unless measuring specific conditions.
- Erratic Altitude Readings: If altitude readings are fluctuating, make sure the sensor is securely connected and that the power supply is stable.
Conclusion
In this project, we successfully set up an altimeter and environmental sensor using the BME280 sensor and ESP32 microcontroller. With just a few components and some programming, we created a compact system capable of accurately measuring temperature, humidity, atmospheric pressure, and altitude. This setup opens up numerous possibilities for applications, such as personal weather stations, altimeters for drones, or IoT-enabled environmental monitoring systems.
The BME280 sensor, paired with the ESP32, proved to be a cost-effective and reliable solution for gathering environmental data. This project demonstrates how easy it is to build functional and practical devices that contribute valuable data to the digital world. You can expand this system further by adding cloud connectivity or integrating additional sensors, transforming it into a fully-fledged IoT solution for real-time monitoring.
