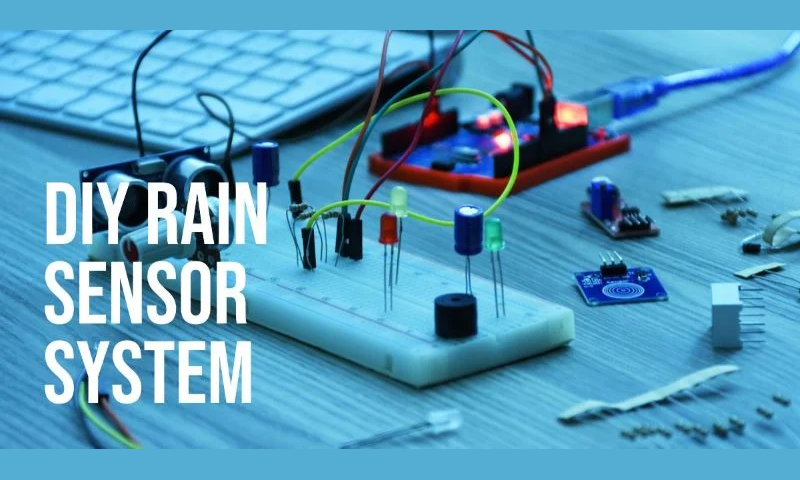
Building an Arduino-Based Rain Sensor System: Complete Tutorial
Rain sensor modules are widely used in various projects where the detection of rain or moisture is crucial. These sensors can automate systems like irrigation, smart windows, and weather monitoring, ensuring that actions such as closing windows or adjusting watering schedules happen automatically when it rains. When integrated with an Arduino, the rain sensor module can become part of a smart, automated system capable of real-time rain detection, making your projects both efficient and reactive to environmental conditions.
In this article, we’ll dive into the workings of a rain sensor module, how it connects to Arduino, and its real-world applications. By the end of this guide, you’ll be able to build a functioning rain detection system with Arduino and explore how this setup can be applied in home automation or industrial processes.
Rain Sensor Module Overview
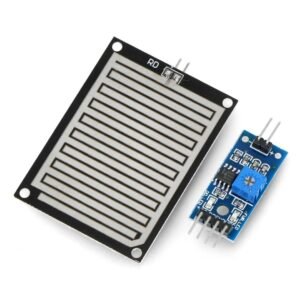
A rain sensor module typically consists of two parts: the sensor board and the control board. The sensor board detects the presence of rain, while the control board processes the signals from the sensor and provides an output that can be read by an Arduino or any other microcontroller. The module is designed to be simple and cost-effective, making it ideal for DIY projects and small-scale automation.
Explanation of the Rain Sensor Module’s Components
- Sensor Board: The sensor board is a conductive plate or grid that detects rain through its change in resistance. When raindrops fall on the board, they create a conductive path between the lines on the sensor board, changing the resistance. This change in resistance is then interpreted as rain detection.
- Control Board: The control board receives the signal from the sensor board and processes it. It typically has a potentiometer that allows you to adjust the sensor’s sensitivity to rain. The control board outputs both digital and analog signals. The digital output gives a simple HIGH/LOW reading, while the analog output provides a variable signal based on the amount of rain detected.
Working Principle of the Rain Sensor
The rain sensor works on the principle of conductivity. In dry conditions, there is little to no conductive path between the lines on the sensor board, so the resistance remains high. When water (rain) falls on the sensor board, it forms a conductive path, decreasing the resistance. This drop in resistance is picked up by the control board, which translates it into a signal that can be used by an Arduino or another microcontroller to trigger actions.
Technical Specifications
- Operating Voltage: 3.3V to 5V DC
- Output: Digital (0 or 1) and Analog (variable voltage based on rain intensity)
- Sensitivity Adjustment: Via potentiometer on the control board
- Dimensions: Typically small (varies by model, around 3-5 cm sensor board)
- Mounting Holes: Often included for easy installation
- Output Signal Types: Digital signal (HIGH/LOW), Analog signal (variable voltage)
Components Required
To set up a rain sensor module with Arduino, you will need the following components:
- Rain Sensor Module: This includes both the sensor and control boards that will detect rain and communicate with the Arduino.
- Arduino Board (e.g., Uno): The Arduino will process the signals from the rain sensor and trigger appropriate actions based on rain detection.
- Jumper Wires: These will be used to connect the rain sensor to the Arduino.
- Resistors (if needed): Depending on the setup, resistors may be required to limit current or adjust voltage.
- Power Supply: Usually a 5V DC power source to power the Arduino and sensor module.
Optional Components:
- Relay Module: If you wish to control higher power devices, such as motors or pumps, based on rain detection, a relay module is recommended to handle the higher current.
- Buzzer/LED: For an immediate visual or auditory alert when rain is detected.
- Servo Motor: Useful for automation tasks like opening/closing windows or controlling irrigation valves.
Rain Sensor and Arduino Circuit Connection
To connect the rain sensor module to an Arduino, you’ll be using both the sensor board and the control board. The control board provides two outputs: digital and analog, which can be connected to the Arduino’s input pins. The digital output provides a simple ON/OFF signal, while the analog output gives a more detailed reading based on the intensity of the rain.
Detailed Description of the Connections:
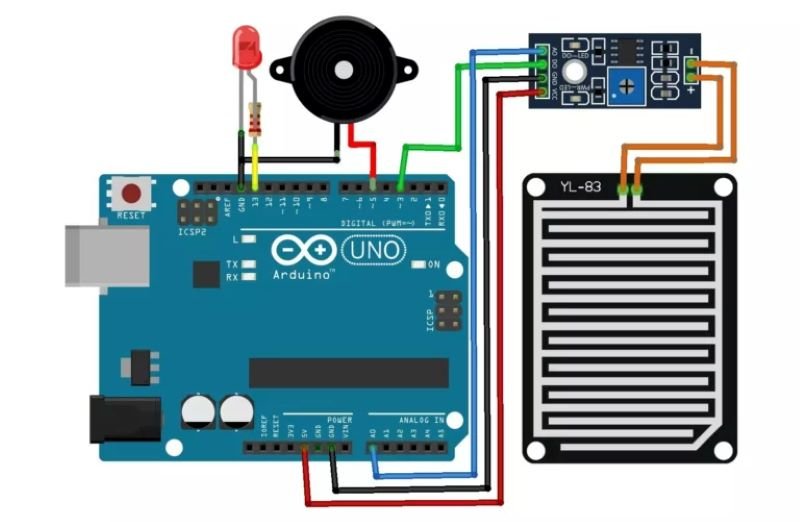
- VCC: Connect this pin from the rain sensor control board to the 5V pin on the Arduino.
- GND: Connect this pin to the GND (ground) pin on the Arduino.
- Digital Output (D0): This pin provides a HIGH/LOW signal. Connect this to any digital input pin on the Arduino (e.g., pin 2).
- Analog Output (A0): For more precise rain detection, connect this pin to one of the Arduino’s analog input pins (e.g., A0).
Optionally, you can connect an LED or buzzer to one of the Arduino’s output pins (e.g., pin 13) to provide feedback when rain is detected.
Arduino Code for Rain Sensor
Now that the rain sensor is connected, the next step is to write the code that detects the rain and performs an action, such as turning on an LED when rain is detected. Here’s a breakdown of the code and how it works.
Logic Behind the Code:
- The Arduino will continuously read the digital and analog signals from the rain sensor.
- If the digital output (D0) is HIGH, it means no rain is detected; if it’s LOW, rain is present.
- The analog output provides a range of values, giving you an idea of the rain intensity.
- Based on the rain detection, you can trigger actions like lighting an LED, sending a signal, or controlling a motor.
// Define pin connections
const int rainDigitalPin = 2; // Digital pin for rain sensor
const int rainAnalogPin = A0; // Analog pin for rain sensor
const int ledPin = 13; // Pin for LED (optional)

// Variable to store sensor values
int rainDigitalValue = 0;
int rainAnalogValue = 0;

void setup() {
pinMode(rainDigitalPin, INPUT); // Set rain sensor digital pin as input
pinMode(ledPin, OUTPUT); // Set LED pin as output
Serial.begin(9600); // Start serial communication for debugging
}

void loop() {
// Read values from rain sensor
rainDigitalValue = digitalRead(rainDigitalPin);
rainAnalogValue = analogRead(rainAnalogPin);

// Check digital output (simple rain detection)
if (rainDigitalValue == LOW) {
// Rain detected
digitalWrite(ledPin, HIGH); // Turn on LED
Serial.println("Rain detected!");
} else {
// No rain
digitalWrite(ledPin, LOW); // Turn off LED
Serial.println("No rain detected.");
}

// Print analog value (rain intensity)
Serial.print("Analog Value: ");
Serial.println(rainAnalogValue);

delay(1000); // Delay for readability
}
Explanation of the Code’s Key Parts:
- Pin Declarations: The digital and analog pins are assigned to variables (
rainDigitalPin,rainAnalogPin), and the LED pin is set up for visual feedback. - Setup Function: Here, the rain sensor pins are set as inputs, and the LED pin is set as an output. The
Serial.begin(9600)function is used to start serial communication, which helps in debugging and printing sensor values. - Loop Function: The digital signal from the rain sensor is read using
digitalRead(), and the analog signal is read usinganalogRead(). Depending on whether rain is detected, the code either turns on the LED or keeps it off. The analog value is also printed in the serial monitor to give an idea of rain intensity.
Working of Rain Sensor with Arduino
Once you’ve uploaded the code to the Arduino and set up the circuit, here’s a step-by-step explanation of how the rain sensor and Arduino system works:
- Rain Detection:
- When the rain sensor detects moisture, the conductive paths on the sensor board form, causing the resistance to drop. The control board registers this change and outputs a LOW signal from the digital pin, indicating that rain is detected.
- Arduino Reads the Signals:
- The Arduino reads the digital output from the sensor (HIGH/LOW). If the output is LOW (rain detected), the Arduino turns on an LED or triggers other actions. Simultaneously, the analog signal is read, which provides more granular information about how much rain is falling.
- Triggering an Action:
- In the code example, an LED turns on when rain is detected, providing immediate feedback. In a real-world scenario, this could trigger actions like closing windows, stopping an irrigation system, or sending an alert to the user.
- Example Use Case:
- Imagine using the system in a smart irrigation project. When rain is detected, the system can automatically turn off the sprinklers to avoid overwatering the plants. If the rain intensity is low (as seen from the analog reading), it might wait before deactivating the sprinklers.
Applications of Rain Sensor Module
Rain sensor modules, when integrated with Arduino, open up a wide range of practical applications. Here are some of the most common real-world uses for this setup:
- Automated Irrigation Systems: One of the most popular uses of rain sensors is in automated irrigation systems. By detecting rain, the system can adjust watering schedules for plants or crops. This prevents overwatering, conserves water, and ensures plants get the right amount of moisture without manual intervention.
- Smart Windows or Roofs: Rain sensors can be used in smart home automation to control windows or roofs. For example, when rain is detected, windows can be automatically closed to prevent water from entering the home. This is particularly useful in greenhouses, car sunroofs, and automated skylights.
- Rainwater Harvesting Systems: Rain sensors can be used to trigger the opening or closing of valves in rainwater harvesting systems. When the sensor detects rain, it can activate mechanisms to divert water to storage tanks, ensuring efficient water collection without human intervention.
- Weather Stations: In weather monitoring systems, rain sensors provide data about precipitation levels. Combined with other sensors (e.g., temperature, humidity), they help create a comprehensive weather station for environmental monitoring and prediction.
Advantages of Using a Rain Sensor
Using a rain sensor module with Arduino offers several advantages, making it an excellent choice for DIY projects and professional applications alike:
- Low Cost: Rain sensor modules are affordable and widely available, making them accessible for hobbyists and developers working on budget-friendly projects.
- Easy Integration with Arduino: The rain sensor can be easily connected to an Arduino, requiring minimal wiring and programming. Even beginners can set up the system with basic knowledge of electronics.
- Reliable Detection: Rain sensors are designed to be reliable in detecting moisture. Their sensitivity can be adjusted, ensuring that they can respond accurately to different rain conditions.
- Energy Efficient: These modules consume very little power, which makes them ideal for use in low-power or battery-operated devices, such as remote weather stations or irrigation systems.
- Versatile Applications: Rain sensors are versatile and can be applied in various fields, from home automation to agriculture. Their ability to integrate into larger systems makes them valuable for a wide range of projects.
Conclusion
In this article, we’ve explored the rain sensor module, its integration with Arduino, and the practical applications it enables. From automated irrigation systems to smart home solutions, rain sensors provide an efficient way to detect precipitation and trigger actions without manual intervention. Their low cost, reliability, and ease of use make them ideal for a wide variety of projects, whether you’re a hobbyist or a professional.
By understanding how the rain sensor works and experimenting with its applications, you can enhance your automation systems and contribute to more efficient, responsive environments. Whether you’re conserving water or protecting your home from rain damage, the rain sensor module is a simple but powerful tool in the world of electronics and automation.
