Monitor Air Quality in Real-Time Using ESP32 and Blynk IoT Platform
Introduction
Air quality is a critical factor that directly impacts our health and the environment. Poor air quality, caused by pollutants like particulate matter, carbon dioxide, and volatile organic compounds, can lead to respiratory issues, cardiovascular diseases, and environmental degradation. Monitoring air quality helps us to be aware of the pollutant levels in our surroundings, enabling us to take timely actions to mitigate their effects. With the advancement of technology, it is now possible to create affordable, real-time air quality monitoring systems that can be easily implemented in homes, offices, and public spaces.
Project Goals
This project aims to develop a real-time air quality monitoring system using the ESP32 microcontroller and the Blynk IoT platform. The primary goal is to create a portable, cost-effective device that can measure air quality and display the data on a mobile app in real time. By leveraging the capabilities of the ESP32 and Blynk, users can remotely monitor air quality and receive alerts if the air quality deteriorates. This project will demonstrate how to set up the system, connect the necessary components, and implement the software to achieve seamless real-time monitoring.
Components Required
List of Components
- ESP32: A versatile microcontroller with built-in Wi-Fi and Bluetooth capabilities.
- Air Quality Sensor (e.g., MQ135): A sensor that detects various gases and pollutants, including CO2, NH3, benzene, and smoke.
- Blynk App: An IoT platform that allows you to create mobile and web applications for the ESP32.
- Resistors: Used to limit the current in the circuit.
- Breadboard: A prototyping board for building the circuit without soldering.
- Jumper Wires: Wires used to connect components on the breadboard.
- USB Cable: For uploading the code to the ESP32 and powering it.
Brief Description
- ESP32: The brain of the project, responsible for reading data from the sensor and sending it to the Blynk app via Wi-Fi.
- MQ135 Air Quality Sensor: Measures the concentration of harmful gases in the air and provides an analog output that can be read by the ESP32.
- Blynk App: Allows you to create a user interface on your smartphone to monitor the air quality data sent from the ESP32.
- Resistors: Used in the circuit to ensure that components receive the correct voltage and current.
- Breadboard and Jumper Wires: These help in quickly assembling the circuit, making it easy to connect the sensor to the ESP32.
- USB Cable: Essential for uploading the code from your computer to the ESP32 and for powering the microcontroller during development.
Circuit Diagram
Circuit Schematic
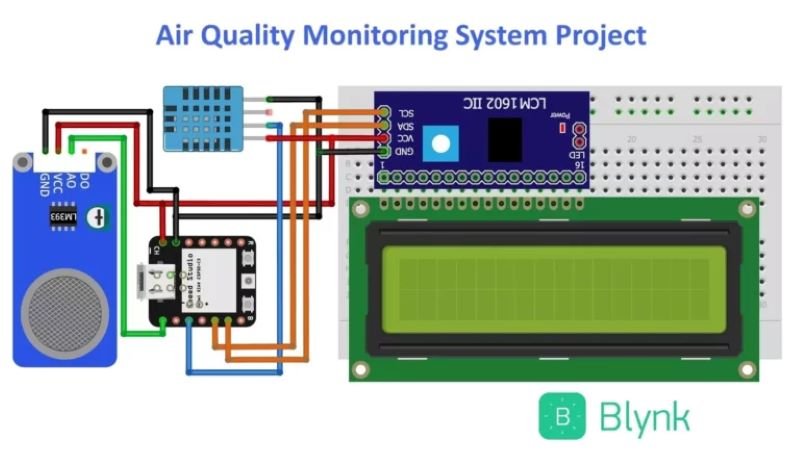
To build the air quality monitoring system, follow the circuit schematic provided below. Ensure that all connections are correctly made to avoid any issues during testing.
Here, you would include a clear and labeled circuit diagram showing the ESP32, the MQ135 sensor, resistors, and the connections to power and ground.
Connection Details
- MQ135 Sensor: Connect the VCC pin of the MQ135 to the 3.3V pin on the ESP32. Connect the GND pin of the MQ135 to the GND pin on the ESP32. The analog output pin of the MQ135 should be connected to an analog input pin on the ESP32, such as GPIO36 (A0).
- Resistors: Use a pull-down resistor (e.g., 10kΩ) if needed to stabilize the analog signal from the MQ135 sensor.
- ESP32: Connect the ESP32 to your computer via a USB cable for power and to upload the code. Ensure that the sensor connections are secure and correct before powering up the ESP32.
Setting Up Blynk IoT Platform
Creating a Blynk Account
To begin, download the Blynk app from the App Store or Google Play Store. Once installed, open the app and sign up for a free account using your email address. After signing up, you will be asked to create a new project.
Setting Up the Project in Blynk
- Create a New Project: Click on the “New Project” button and give your project a name, such as “Air Quality Monitor.” Select ESP32 as the device type and choose Wi-Fi as the connection type.
- Add Widgets: After creating the project, you will be directed to the project dashboard. Click on the “+” icon to add widgets like a Gauge or Graph. Configure these widgets to display the data from the air quality sensor. For example, you can set up a gauge to display the air quality index or a graph to show the trend over time.
- Configure the Pins: Assign the correct virtual pins in the widget settings, corresponding to the pins on the ESP32 where the sensor data is being read.
Getting the Auth Token
Once your project is set up, Blynk will send an Auth Token to your registered email address. This token is unique to your project and is necessary for the ESP32 to communicate with the Blynk server. Copy the Auth Token from your email and paste it into the ESP32 code where indicated. This token allows your ESP32 to securely send data to your Blynk app, enabling real-time monitoring.
ESP32 Code Implementation
Code Explanation
Below is the basic code for the Air Quality Monitoring System using ESP32 and Blynk:
#include <WiFi.h>
#include <BlynkSimpleEsp32.h>

char auth[] = "YourAuthToken"; // Replace with your Blynk Auth Token
char ssid[] = "YourWiFiSSID"; // Replace with your WiFi SSID
char pass[] = "YourWiFiPassword"; // Replace with your WiFi password

int airQualityPin = 36; // Analog pin connected to the MQ135 sensor
BlynkTimer timer;

void setup()
{
Serial.begin(115200);
Blynk.begin(auth, ssid, pass);

timer.setInterval(1000L, sendSensor); // Send data every second
}

void sendSensor()
{
int sensorValue = analogRead(airQualityPin);
float voltage = sensorValue * (3.3 / 4095.0); // Convert analog value to voltage
Blynk.virtualWrite(V1, voltage); // Send voltage to Blynk app on V1
Serial.println(voltage); // Print the voltage value to the Serial Monitor
}

void loop()
{
Blynk.run();
timer.run(); // Run the timer
}
- WiFi Credentials: The
ssidandpassvariables store your WiFi network name and password. These are required for the ESP32 to connect to your network. - Auth Token: The
authvariable holds the unique token for your Blynk project, allowing the ESP32 to communicate with the Blynk server. - Analog Reading: The
analogReadfunction reads the voltage level from the MQ135 sensor connected to the analog pin. This value is then converted to a voltage and sent to the Blynk app. - Blynk Virtual Write: The
Blynk.virtualWritefunction sends the sensor data to the Blynk app on a virtual pin, in this case,V1.
Uploading the Code
To upload the code to the ESP32 using the Arduino IDE:
- Install ESP32 Board: First, ensure you have the ESP32 board installed in the Arduino IDE. Go to
File > Preferences, addhttps://dl.espressif.com/dl/package_esp32_index.jsonto the “Additional Boards Manager URLs”, then go toTools > Board > Boards Manager, search for “ESP32”, and install it. - Select the ESP32 Board: Go to
Tools > Boardand selectESP32 Dev Modulefrom the list. - Select the COM Port: Connect your ESP32 to the computer via USB and select the appropriate COM port under
Tools > Port. - Upload the Code: Click the Upload button (right arrow) in the Arduino IDE to compile and upload the code to the ESP32.
Connecting to Wi-Fi
Once the code is uploaded, the ESP32 will automatically attempt to connect to the specified Wi-Fi network using the SSID and password provided in the code. Upon successful connection, the ESP32 will also connect to the Blynk server using the Auth Token. This connection allows the ESP32 to send real-time air quality data to the Blynk app for remote monitoring.
Testing and Calibration
Initial Testing
To verify that the system is working correctly:
- Power the ESP32: After uploading the code, power the ESP32 via USB or an external power source.
- Open the Serial Monitor: In the Arduino IDE, go to
Tools > Serial Monitorto view the output from the ESP32. You should see the voltage readings from the MQ135 sensor being printed. - Check Blynk App: Open the Blynk app on your smartphone. The gauge or graph widget should display the air quality data in real-time, confirming that the ESP32 is sending data to the app.
Calibrating the Air Quality Sensor
To calibrate the MQ135 air quality sensor for accurate readings:
- Expose to Fresh Air: Place the sensor in a well-ventilated area with known good air quality. Note the voltage reading; this will serve as a baseline.
- Use a Reference Gas: If possible, expose the sensor to a controlled concentration of a specific gas (e.g., CO2) to determine the sensor’s response.
- Adjust Code for Calibration: Modify the code to include calibration constants that adjust the voltage readings based on the sensor’s behavior. This can involve scaling the raw data or applying a correction factor.
Monitoring Air Quality Using Blynk
Real-Time Data Visualization
In the Blynk app, the data from the air quality sensor is displayed in real-time on the widgets you’ve set up, such as gauges or graphs. These visual elements allow you to monitor changes in air quality levels as they happen, offering a clear and immediate view of the environment.
Setting Up Alerts
To ensure you’re notified when air quality drops below a safe threshold, you can configure alerts in the Blynk app:
- Add a Notification Widget: In your Blynk project, add a Notification widget.
- Set Alert Conditions: Modify the
sendSensor()function in your ESP32 code to include a condition that checks if the air quality value exceeds a certain limit. If it does, trigger the Notification widget to send an alert to your smartphone. - Example Code:
if (voltage > threshold) {
Blynk.notify("Air quality is deteriorating!");
}
This will send a push notification to your phone when the air quality deteriorates.
Applications and Use Cases
Practical Applications
The Air Quality Monitoring System can be utilized in various settings:
- Homes: Monitor indoor air quality to ensure a healthy living environment, especially in areas prone to pollution.
- Offices: Maintain good air quality in workspaces to enhance employee well-being and productivity.
- Public Spaces: Install the system in public areas like schools, hospitals, or parks to keep the community informed about air quality levels.
Potential Enhancements
To expand the functionality of this project:
- Additional Sensors: Integrate other environmental sensors (e.g., temperature, humidity) to create a comprehensive indoor air quality monitoring station.
- Multiple Locations: Deploy multiple units across different locations and centralize the data in a single Blynk dashboard.
- Cloud Integration: Integrate the system with cloud platforms like Google Firebase or AWS IoT for long-term data storage and advanced analytics.
Conclusion
In this project, we developed an Air Quality Monitoring System using the ESP32 and Blynk IoT platform. We covered everything from setting up the hardware, connecting to Wi-Fi, coding, and real-time monitoring of air quality data on a smartphone. This system provides an efficient way to monitor air quality and can be implemented in various environments.
Looking forward, this project can be enhanced by incorporating additional sensors, integrating with other IoT platforms, or even using AI to predict air quality trends. With the growing concern for air pollution, such systems could play a vital role in maintaining healthy environments both indoors and outdoors.