How to Display Sensor Data with Bluetooth on OLED Screen?
Bluetooth technology is now a common feature in everyday life, making it almost impossible to go through a day without using it. Despite its seemingly complex nature, integrating Bluetooth into your projects is relatively simple.
Displaying Accelerometer Data Over Bluetooth
In this project, we’ll connect an accelerometer to the ESP32 board to display axis data through various methods. We’ll keep things straightforward by using Qwiic Connect hardware to avoid soldering. The hardware setup includes an ESP32 Thing Plus Wroom and a Qwiic Triple Axis Accelerometer module. Additionally, you’ll need a USB to USB-C cable to upload code from the Arduino IDE to your board and a power supply for the ESP32 Thing Plus Wroom. You can easily add all the required items to your cart using the wishlist below.
Each data display method will involve a slightly different hardware configuration.
Display Data on an OLED
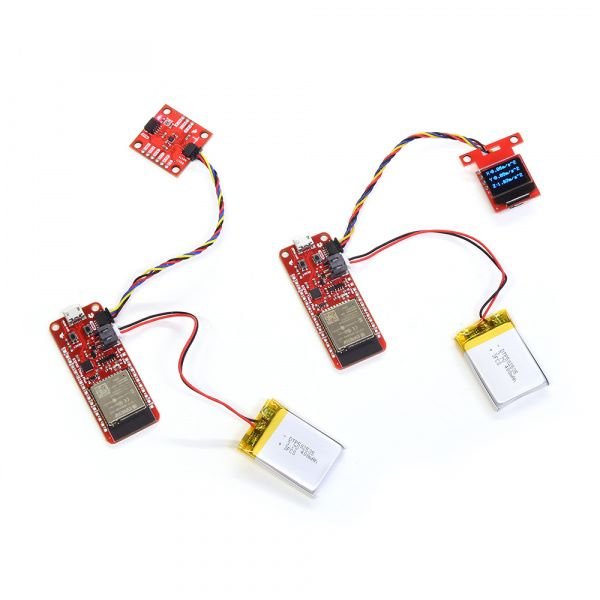
By following the instructions for Option 1, you’ll learn to display accelerometer data on an OLED attached to the client ESP32 board. Required materials include two ESP32 Thing Plus C boards, a KX132 Triple Axis Accelerometer, a Micro OLED Breakout (Qwiic), a USB A to USB C cable, and a power supply. We recommend using a Lithium Ion Battery with a JST-PH Connector for the server ESP32 board’s power supply, though various power sources are compatible.
Displaying Data With an OLED Screen
OLED displays are highly popular due to their advanced technology. This option will guide you on using an OLED screen to display your data.
Hardware Setup
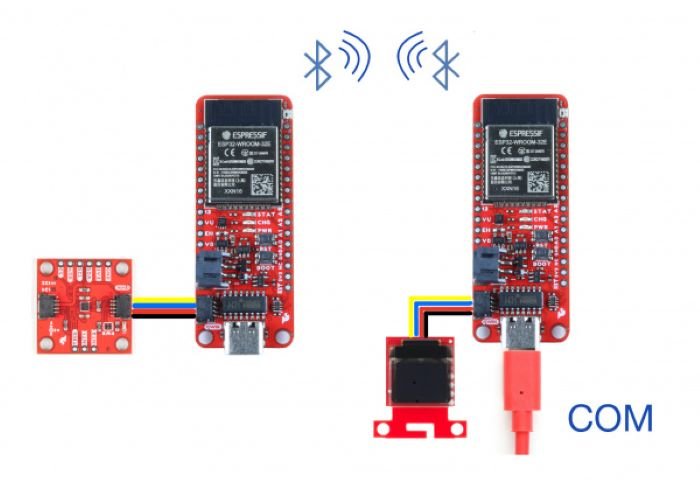
Instead of using the serial monitor or a mobile device, this option connects one ESP32 board to an OLED, while the other ESP32 board is linked to a KX132 Triple Axis Accelerometer and a power source.
Uploading the Code
Now, we will designate one ESP32 board as the client and the other as the server. The main thing is that the client board is attached to the OLED breakout, on the other hand the server board is connected to the accelerometer.
Upload the following code to the client ESP32:
#include <SparkFun_Qwiic_OLED.h>

QwiicMicroOLED myOLED;
// QwiicTransparentOLED myOLED;
// QwiicNarrowOLED myOLED;

#include "BLEDevice.h"
char disptext1[16];
char disptext2[16];
char disptext3[16];
char buffer[16];
float result1;
float result2;
float result3;

// The remote service we wish to connect to.
static BLEUUID serviceUUID("4fafc201-1fb5-459e-8fcc-c5c9c331914b");
// The characteristic of the remote service we are interested in.
static BLEUUID charUUID("beb5483e-36e1-4688-b7f5-ea07361b26a8");
static BLEUUID charAccXUUID("fb6cf981-31cc-4f36-af06-1f2f3e919840"); // use the same UUID as on the server
static BLEUUID charAccYUUID("35b17f66-73d1-4c92-92f6-9032ef1987d3");
static BLEUUID charAccZUUID("3cab9341-e65b-46e9-83ed-c8a7f2f841c2");

static boolean doConnect = false;
static boolean connected = false;
static boolean doScan = false;
static BLERemoteCharacteristic* pRemoteCharacteristic;
static BLERemoteCharacteristic* pRemoteCharacteristicACCx;
static BLERemoteCharacteristic* pRemoteCharacteristicACCy;
static BLERemoteCharacteristic* pRemoteCharacteristicACCz;
static BLEAdvertisedDevice* myDevice;

static void notifyCallback(
BLERemoteCharacteristic* pBLERemoteCharacteristic,
uint8_t* pData,
size_t length,
bool isNotify) {
Serial.print("Notify callback for characteristic ");
Serial.print(pBLERemoteCharacteristic->getUUID().toString().c_str());
Serial.print(" of data length ");
Serial.println(length);
Serial.print("data: ");
Serial.println((char*)pData);
}

class MyClientCallback : public BLEClientCallbacks {
void onConnect(BLEClient* pclient) {
}

void onDisconnect(BLEClient* pclient) {
connected = false;
Serial.println("onDisconnect");
}
};

bool connectToServer() {
Serial.print("Forming a connection to ");
Serial.println(myDevice->getAddress().toString().c_str());

BLEClient* pClient = BLEDevice::createClient();
Serial.println(" - Created client");

pClient->setClientCallbacks(new MyClientCallback());

// Connect to the remove BLE Server.
pClient->connect(myDevice); // if you pass BLEAdvertisedDevice instead of address, it will be recognized type of peer device address (public or private)
Serial.println(" - Connected to server");
pClient->setMTU(517); //set client to request maximum MTU from server (default is 23 otherwise)

// Obtain a reference to the service we are after in the remote BLE server.
BLERemoteService* pRemoteService = pClient->getService(serviceUUID);
if (pRemoteService == nullptr) {
Serial.print("Failed to find our service UUID: ");
Serial.println(serviceUUID.toString().c_str());
pClient->disconnect();
return false;
}
Serial.println(" - Found our service");

// Obtain a reference to the characteristic in the service of the remote BLE server.
pRemoteCharacteristic = pRemoteService->getCharacteristic(charUUID);
if (pRemoteCharacteristic == nullptr) {
Serial.print("Failed to find our characteristic UUID: ");
Serial.println(charUUID.toString().c_str());
pClient->disconnect();
return false;
}
Serial.println(" - Found our characteristic");
//ACC X Obtain a reference to the characteristic in the service of the remote BLE server.
pRemoteCharacteristicACCx = pRemoteService->getCharacteristic(charAccXUUID);
if (pRemoteCharacteristicACCx == nullptr) {
Serial.print("Failed to find our characteristic UUID x: ");
Serial.println(charAccXUUID.toString().c_str());
pClient->disconnect();
return false;
}
Serial.println(" - Found our characteristic");
//ACC Y Obtain a reference to the characteristic in the service of the remote BLE server.
pRemoteCharacteristicACCy = pRemoteService->getCharacteristic(charAccYUUID);
if (pRemoteCharacteristicACCy == nullptr) {
Serial.print("Failed to find our characteristic UUID y: ");
Serial.println(charAccYUUID.toString().c_str());
pClient->disconnect();
return false;
}
Serial.println(" - Found our characteristic");
//ACC Z Obtain a reference to the characteristic in the service of the remote BLE server.
pRemoteCharacteristicACCz = pRemoteService->getCharacteristic(charAccZUUID);
if (pRemoteCharacteristicACCz == nullptr) {
Serial.print("Failed to find our characteristic UUID z: ");
Serial.println(charAccZUUID.toString().c_str());
pClient->disconnect();
return false;
}
Serial.println(" - Found our characteristic");
// Read the value of the characteristic.
if(pRemoteCharacteristic->canRead()) {
std::string value = pRemoteCharacteristic->readValue();
Serial.print("The characteristic value was: ");
Serial.println(value.c_str());
}

if(pRemoteCharacteristic->canNotify())
pRemoteCharacteristic->registerForNotify(notifyCallback);

connected = true;
return true;
}
/**
* Scan for BLE servers and find the first one that advertises the service we are looking for.
*/
class MyAdvertisedDeviceCallbacks: public BLEAdvertisedDeviceCallbacks {
/**
* Called for each advertising BLE server.
*/
void onResult(BLEAdvertisedDevice advertisedDevice) {
Serial.print("BLE Advertised Device found: ");
Serial.println(advertisedDevice.toString().c_str());

// We have found a device, let us now see if it contains the service we are looking for.
if (advertisedDevice.haveServiceUUID() && advertisedDevice.isAdvertisingService(serviceUUID)) {

BLEDevice::getScan()->stop();
myDevice = new BLEAdvertisedDevice(advertisedDevice);
doConnect = true;
doScan = true;

} // Found our server
} // onResult
}; // MyAdvertisedDeviceCallbacks

void setup() {
Serial.begin(115200);
Serial.println("Starting Arduino BLE Client application...");
BLEDevice::init("");
Wire.begin();
// Retrieve a Scanner and set the callback we want to use to be informed when we
// have detected a new device. Specify that we want active scanning and start the
// scan to run for 5 seconds.
BLEScan* pBLEScan = BLEDevice::getScan();
pBLEScan->setAdvertisedDeviceCallbacks(new MyAdvertisedDeviceCallbacks());
pBLEScan->setInterval(1349);
pBLEScan->setWindow(449);
pBLEScan->setActiveScan(true);
pBLEScan->start(5, false);

if (myOLED.begin() == false)
{
Serial.println("Device begin failed. Freezing...");
while (true)
;
}
Serial.println("Begin success");
} // End of setup.
// This is the Arduino main loop function.
void loop() {
// If the flag "doConnect" is true then we have scanned for and found the desired
// BLE Server with which we wish to connect. Now we connect to it. Once we are
// connected we set the connected flag to be true.
if (doConnect == true) {
if (connectToServer()) {
Serial.println("We are now connected to the BLE Server.");
} else {
Serial.println("We have failed to connect to the server; there is nothin more we will do.");
}
doConnect = false;
}
// If we are connected to a peer BLE Server, update the characteristic each time we are reached
// with the current time since boot.
if (connected) {
String newValue = "Time since boot: " + String(millis()/1000);
//Serial.println("Setting new characteristic value to \"" + newValue + "\"");

// Set the characteristic's value to be the array of bytes that is actually a string.
// pRemoteCharacteristic->writeValue(newValue.c_str(), newValue.length());//***********JKO
}else if(doScan){
BLEDevice::getScan()->start(0); // this is just example to start scan after disconnect, most likely there is better way to do it in arduino
}
// read the Characteristics and store them in a variable
// This also makes the print command do float handling
float XValue = pRemoteCharacteristicACCx->readFloat();
float YValue = pRemoteCharacteristicACCy->readFloat();
float ZValue = pRemoteCharacteristicACCz->readFloat();
Serial.print(XValue);
Serial.print("\t");
Serial.print(YValue);
Serial.print("\t");
Serial.println(ZValue);
myOLED.erase();
result1 = XValue;
result2 = YValue;
Upload the following code to the server ESP32:
#include <BLEDevice.h>
#include <BLEUtils.h>
#include <BLEServer.h>
#include <Wire.h> // Must include Wire library for I2C

// Replace with your preferred accelerometer library or remove if not needed
// Example: #include <YourAccelerometerLibrary.h>
#include <SparkFun_KX13X.h> // Click here to get the library: http://librarymanager/All#SparkFun_KX13X

SparkFun_KX132 kxAccel;
outputData myData; // Struct for the accelerometer's data

#define SERVICE_UUID "4fafc201-1fb5-459e-8fcc-c5c9c331914b"
#define CHARACTERISTIC_UUID "beb5483e-36e1-4688-b7f5-ea07361b26a8"
#define CHARACTERISTIC_ACCX_UUID "fb6cf981-31cc-4f36-af06-1f2f3e919840"
#define CHARACTERISTIC_ACCY_UUID "35b17f66-73d1-4c92-92f6-9032ef1987d3"
#define CHARACTERISTIC_ACCZ_UUID "3cab9341-e65b-46e9-83ed-c8a7f2f841c2"

// makes the characteristic global
static BLECharacteristic *pCharacteristicAccX;
static BLECharacteristic *pCharacteristicAccY;
static BLECharacteristic *pCharacteristicAccZ;

void setup() {
Serial.begin(115200);
Serial.println("Starting BLE work!");
Wire.begin();

// Initialize your accelerometer
if (!kxAccel.begin()) {
Serial.println("Could not communicate with the KX13X accelerometer.");
while (1);
}

if (kxAccel.softwareReset())
Serial.println("Reset.");

// Give some time for the accelerometer to reset.
// It needs two, but give it five for good measure.
delay(5);

kxAccel.enableAccel(false);
kxAccel.setRange(SFE_KX132_RANGE16G); // 16g Range
kxAccel.enableDataEngine();
kxAccel.enableAccel();

BLEDevice::init("CompileIoT");
BLEServer *pServer = BLEDevice::createServer();
BLEService *pService = pServer->createService(SERVICE_UUID);

BLECharacteristic *pCharacteristic = pService->createCharacteristic(
CHARACTERISTIC_UUID,
BLECharacteristic::PROPERTY_READ |
BLECharacteristic::PROPERTY_WRITE
);
pCharacteristicAccX = pService->createCharacteristic(
CHARACTERISTIC_ACCX_UUID,
BLECharacteristic::PROPERTY_READ |
BLECharacteristic::PROPERTY_WRITE
);
pCharacteristicAccY = pService->createCharacteristic(
CHARACTERISTIC_ACCY_UUID,
BLECharacteristic::PROPERTY_READ |
BLECharacteristic::PROPERTY_WRITE
);
pCharacteristicAccZ = pService->createCharacteristic(
CHARACTERISTIC_ACCZ_UUID,
BLECharacteristic::PROPERTY_READ |
BLECharacteristic::PROPERTY_WRITE
);

pCharacteristic->setValue("Hello World from CompileIoT");
pService->start();

BLEAdvertising *pAdvertising = BLEDevice::getAdvertising();
pAdvertising->addServiceUUID(SERVICE_UUID);
pAdvertising->setScanResponse(true);
pAdvertising->setMinPreferred(0x06);
pAdvertising->setMinPreferred(0x12);
BLEDevice::startAdvertising();

Serial.println("Characteristics defined!");
}

void loop() {
if (kxAccel.dataReady()) {
kxAccel.getAccelData(&myData);
float tempX = myData.xData;
pCharacteristicAccX->setValue(tempX);
float tempY = myData.yData;
pCharacteristicAccY->setValue(tempY);
float tempZ = myData.zData;
pCharacteristicAccZ->setValue(tempZ);

Serial.print(tempX, 4);
Serial.print("\t");
Serial.print(tempY, 4);
Serial.print("\t");
Serial.println(tempZ, 4);
}
delay(100); // 100 ms delay
}
Explanation:
Library Inclusion:
- Include the necessary BLE libraries (
BLEDevice.h,BLEUtils.h,BLEServer.h) for BLE functionality. - Include the Wire library for I2C communication.
- Include or remove the accelerometer library (
SparkFun_KX13X.h) based on your actual hardware and requirements. If you remove it, ensure you don’t use any related functions or variables (kxAccel,myData, etc.).
Global Characteristics:
- Define global BLECharacteristic pointers (
pCharacteristicAccX,pCharacteristicAccY,pCharacteristicAccZ) to hold the accelerometer data.
Setup Function:
- Initialize Serial communication and the Wire library.
- Initialize the accelerometer (
kxAccel) and set its parameters. - Initialize BLE with a device name (“CompileIoT”), create a server (
pServer), and a service (pService) with the specified UUID (SERVICE_UUID). - Create BLE characteristics (
pCharacteristic,pCharacteristicAccX,pCharacteristicAccY,pCharacteristicAccZ), set their properties, and optionally set initial values.
Loop Function:
- Continuously check if accelerometer data is ready (
kxAccel.dataReady()). - If data is ready, retrieve accelerometer data (
kxAccel.getAccelData(&myData)) and update the values of the BLE characteristics (pCharacteristicAccX,pCharacteristicAccY,pCharacteristicAccZ). - Print accelerometer data to Serial for debugging purposes.
- Introduce a delay (
delay(100)) to prevent continuous looping without pause.
Notes:
- Ensure you have the correct libraries installed (
SparkFun_KX13Xor any other accelerometer library you intend to use). - Modify the UUIDs (
SERVICE_UUID,CHARACTERISTIC_UUID,CHARACTERISTIC_ACCX_UUID,CHARACTERISTIC_ACCY_UUID,CHARACTERISTIC_ACCZ_UUID) as needed for your specific application. - Adjust the code further based on the specific requirements of your project, such as handling additional BLE characteristics or integrating more sensors.
Results
Once you upload the code provided, you’ll start receiving acceleration values in meters per second squared (m/s²) for the X, Y, and Z axes. If you encounter any issues, try resetting both ESP32 devices. This application is versatile and adaptable to different sensors—just replace the sensor libraries and adjust the data conversions accordingly. Congratulations! You’ve successfully set up an IoT network.