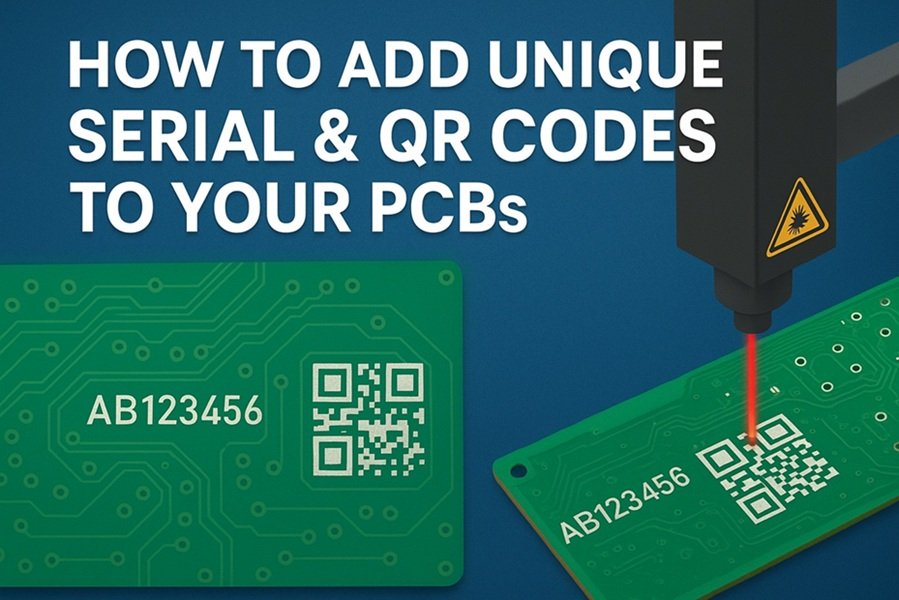
How to Add Unique Serial and QR Codes to Your PCBs with Laser Engraving
In modern electronics manufacturing, traceability is essential. Whether you’re producing custom mechanical keyboard PCBs, IoT devices, development boards, or commercial hardware, adding unique identifiers such as serial numbers, batch IDs, and QR codes ensures that each board can be tracked through production, distribution, and after-sales support.
One of the most reliable and professional methods for marking PCBs is laser engraving. This technique allows you to permanently etch information directly onto the solder mask without affecting the copper traces underneath.
This guide explains why and how to add serials and QR codes to PCBs, covering design steps, engraving methods, and best practices.
Why Add Serial and QR Codes to PCBs?
| Benefit | Description |
|---|---|
| Traceability | Identify which batch or version a PCB came from. |
| Quality Control | Track defects back to specific runs, suppliers, or process changes. |
| Inventory and Warranty Management | Quickly verify authenticity and production date. |
| Better User Support | QR codes can link users to firmware, documentation, or service portals. |
| Professional Branding | Makes your product feel refined and production-ready. |
Adding these identifiers is especially useful when scaling from hobby-level to limited batch or commercial production.
Read This also: How to Design Mechanical Keyboard PCBs with KiCad: A Complete Step-by-Step Guide
Methods to Add Identifiers on PCBs
There are two main approaches:
1. Printed (During Fabrication)
- Serial or code is included as text in silkscreen.
- Requires design updates if each board has unique numbers.
- Not suitable for large unique sets without automated workflows.
2. Laser Engraving (Post-Fabrication)
- Unique codes added after boards are manufactured.
- Works with batch serial assignment.
- Permanent, crisp, and resistant to wear.
Laser engraving is preferred because it allows dynamic codes without changing the PCB design for each unit.
Choosing the Right Area for Codes on the PCB
When planning placement:
- Avoid traces or vias under engraving.
- Use empty copper-free areas (mostly silkscreen regions).
- Ensure the QR code is at least 5mm × 5mm for reliable scanning.
- Leave 1 mm clearance from board edges to avoid cut/trim risks.
Recommended Places
- Bottom side of the PCB (commonly unused visually).
- Near USB/connector edge for visibility.
- In a recessed section under switch plate (keyboards).
How to Prepare the QR Code and Serial Number Data
Creating the QR Code
Use a generator that supports batch encoding:
- https://www.qr-code-generator.com
- https://github.com/swharden/QR-Code-Generator (open source)
- Python library:
pip install qrcode
Generate QR with:
import qrcode
qrcode.make("PRODUCT-ABC-001").save("qr_001.png")
Serial Number Format Suggestions
| Example | Meaning |
|---|---|
| KB-2025-001 | Keyboard, year, unit index |
| R1-B230501 | Revision 1, batch date |
| SN000123 | Incremented device ID |
Choose a structure that supports future scaling.
Laser Engraving Setup
Equipment
- Fiber laser engraver (20W–50W) for metal & PCB masks
- Or UV laser engraver for finest detail marking
CO₂ lasers are not recommended — poor contrast and may burn substrate.
Engraving Depth
- Light surface marking is enough.
- Do not etch deep enough to reach copper.
Recommended Power Settings
| Laser Type | Power | Speed | Passes |
|---|---|---|---|
| Fiber 30W | 15–25% | High | 1–2 |
| UV Laser | 50–70% | Medium | 1 pass |
Always test on scrap PCBs first.
Step-by-Step Engraving Workflow
- Insert PCB into the laser jig
Use a fixed position template to engrave consistently. - Load image or text data into laser software
Programs like EZCAD or LightBurn support QR import. - Adjust focus height
Correct focal distance ensures clarity. - Run a Preview / Red Light Outline
Ensure the engraving fits the intended location. - Engrave
Use recommended speed/power. - Verify Readability
- Test QR with phone or barcode scanner.
- Check for smudging, over-burning, or low contrast.
Optional: Automating Batch Laser Marking
For medium to large productions:
- Use CSV-based engraving scripts
- Each PCB serial is read into laser software automatically
- Conveyor or motorized jig can engrave 50–500 boards/hour
Example CSV:
SN,QR
KB-001,https://example.com/reg/KB-001
KB-002,https://example.com/reg/KB-002
Best Practices & Tips
| Tip | Reason |
|---|---|
| Avoid engraving on copper zones | Can expose copper and cause corrosion |
| Keep QR codes simple | Too much data = denser, harder to scan |
| Test readability under different lighting | Quality control check |
| Maintain a database of all serials issued | Important for support tracking |
Read this also: Reflow Soldering in SMT: Process, Equipment, and Best Practices
Conclusion
Adding unique serial numbers and QR codes to PCBs through laser engraving is a highly effective way to improve traceability, professional appearance, and long-term supportability of your hardware products. This process scales smoothly from small hobby projects to commercial production.
By following the recommended workflows and engraving guidelines, you can create durable, readable, and visually clean markings that enhance your product’s reliability and identity.