Raspberry Pi Interfaces: A Beginner’s Guide
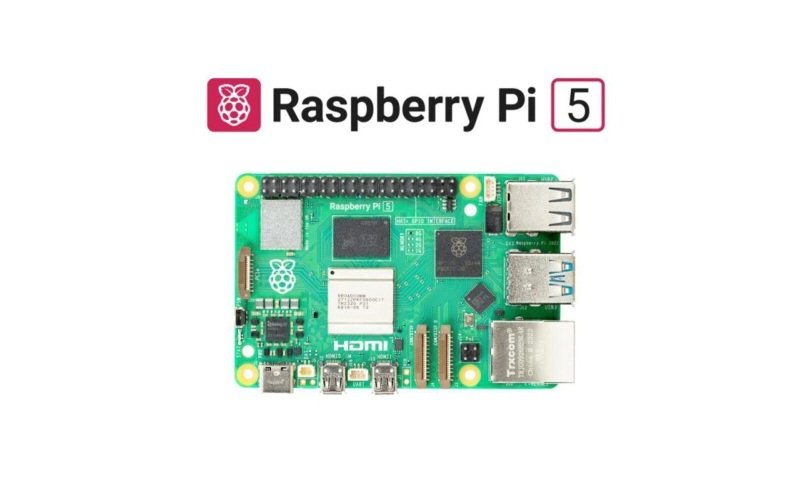
The Raspberry Pi is a small, affordable, and powerful computer that has taken the tech world by storm. It’s a favorite among hobbyists, educators, and tech enthusiasts. One of the reasons for its popularity is its versatility, which comes from the wide variety of interfaces it offers. In this guide, we will explore the key interfaces of the Raspberry Pi and their uses in simple terms.
What Are Raspberry Pi Interfaces?
Interfaces are the different ways the Raspberry Pi connects and communicates with other devices. These connections can be physical (like USB ports) or digital (like GPIO pins). They allow you to connect accessories, sensors, and other hardware to your Raspberry Pi, turning it into a powerful tool for countless applications.
Common Interfaces on Raspberry Pi
1. GPIO (General Purpose Input/Output) Pins
- What It Is: A set of pins on the Raspberry Pi that allow you to interact with other electronic devices.
- How It Works: These pins can be programmed to send signals (output) or receive data (input).
- Uses:
- Connecting sensors (like temperature or motion sensors).
- Controlling LEDs or motors.
- Building circuits for DIY projects.
- Tip: GPIO pins are low-power, so be cautious when connecting external devices.
2. USB Ports
- What It Is: Standard USB ports for connecting peripherals.
- How It Works: Just like your computer, you can plug in keyboards, mice, USB drives, or external hard drives.
- Uses:
- Adding input devices (keyboard/mouse).
- Connecting USB cameras or Wi-Fi dongles.
- Expanding storage with USB drives.
3. HDMI Port
- What It Is: A port for connecting a display.
- How It Works: The Raspberry Pi sends video and audio signals through the HDMI cable to your monitor or TV.
- Uses:
- Displaying the Raspberry Pi’s desktop environment.
- Running media centers or game emulators.
- Viewing real-time data from your projects.
4. Camera Serial Interface (CSI)
- What It Is: A dedicated interface for connecting a camera module.
- How It Works: The CSI port provides a fast and efficient way to connect the official Raspberry Pi Camera Module.
- Uses:
- Capturing images and videos.
- Building security cameras.
- Running AI and machine learning projects like face detection.
5. Display Serial Interface (DSI)
- What It Is: A port for connecting a touchscreen display.
- How It Works: The DSI port allows direct communication with the official Raspberry Pi touchscreen.
- Uses:
- Creating portable or handheld devices.
- Building interactive kiosks.
- Adding touch controls to your projects.
6. Audio Jack
- What It Is: A 3.5mm audio jack for sound output.
- How It Works: Plug in headphones or speakers to hear audio from your Raspberry Pi.
- Uses:
- Listening to music or audio from media applications.
- Adding sound effects to DIY projects.
- Running audio-based applications like voice assistants.
7. Ethernet Port
- What It Is: A port for wired internet connection.
- How It Works: Connect the Raspberry Pi to a router or switch using an Ethernet cable.
- Uses:
- Reliable internet for servers or downloading large files.
- Networking projects like setting up a Pi as a web server.
- IoT applications requiring stable connectivity.
8. Wi-Fi and Bluetooth
- What It Is: Built-in wireless communication features in most modern Raspberry Pi models.
- How It Works: Connect to networks or devices wirelessly.
- Uses:
- Setting up a wireless internet connection.
- Pairing with Bluetooth devices like speakers or keyboards.
- Enabling wireless data transfer.
9. SPI (Serial Peripheral Interface)
- What It Is: A high-speed interface for communicating with other devices.
- How It Works: SPI allows fast data exchange between the Raspberry Pi and peripherals like sensors, displays, or storage devices.
- Uses:
- Driving LED matrices.
- Communicating with microcontrollers.
- Using high-speed sensors.
10. I2C (Inter-Integrated Circuit)
- What It Is: A slower communication interface for connecting multiple devices.
- How It Works: I2C uses two wires to exchange data with connected devices.
- Uses:
- Reading data from multiple sensors.
- Connecting real-time clocks or displays.
- Interfacing with other microcontrollers.
11. Power Input (USB-C or Micro USB)
- What It Is: The port that powers the Raspberry Pi.
- How It Works: Supply power using a USB-C or Micro USB adapter (depending on the Raspberry Pi model).
- Uses:
- Providing energy for the Raspberry Pi and connected devices.
How to Use Raspberry Pi Interfaces
- Plan Your Project: Decide what devices or sensors you want to connect.
- Refer to Pinout Diagrams: Use a Raspberry Pi pinout chart to identify the right GPIO pins or interfaces.
- Connect Devices Carefully: Ensure you use proper cables and avoid overloading the Raspberry Pi.
- Install Required Software: Use libraries like RPi.GPIO or pigpio for programming GPIO pins.
Applications of Raspberry Pi Interfaces
- Home Automation: Use GPIO pins to control lights and appliances.
- Robotics: Connect motors, sensors, and cameras for building robots.
- Media Centers: Use the HDMI port to set up a media player.
- IoT Projects: Combine Wi-Fi, Bluetooth, and sensors to create IoT devices.
Conclusion
The Raspberry Pi’s interfaces make it a powerful and flexible platform for a wide range of projects. Whether you’re a beginner or an experienced maker, understanding these interfaces will unlock endless possibilities. Start exploring, and let your creativity bring your ideas to life!
