How to Control Home Appliances with Arduino and an IR Remote
Automation is becoming an integral part of modern households, making everyday tasks more convenient and efficient. One simple yet effective way to automate home appliances is by using an infrared (IR) remote and an Arduino microcontroller. IR remotes are commonly used with TVs, air conditioners, and audio systems, but with the right setup, they can control almost any electrical appliance.
This project demonstrates how to use an IR remote to operate home appliances such as lights, fans, and more. By integrating an IR receiver, relay module, and Arduino, you can create a cost-effective automation system that is easy to implement and customize.
Materials Required
List of Components
- Arduino Board (e.g., Arduino Uno or Nano)
- IR Receiver Module (e.g., TSOP1738 or VS1838)
- Relay Module (single-channel or multi-channel based on the number of appliances)
- Home Appliances (e.g., LED bulb, fan, or other electrical devices)
- Resistors and Jumper Wires for connections
- Breadboard for prototyping (optional)
- Power Source (e.g., USB cable or 9V battery for Arduino)
Software Tools
- Arduino IDE: For writing and uploading code to the Arduino board.
- IRremote Library: To decode IR signals and map them to appliance controls.
Understanding the Components
IR Remote and How It Works
An IR remote transmits signals in the form of infrared light, invisible to the human eye. These signals are encoded into unique patterns corresponding to each button. An IR receiver detects these signals and converts them into electrical signals that the Arduino can process.
Arduino Board
The Arduino board acts as the brain of this system. It reads the IR signals from the receiver, processes them, and activates the corresponding relay to control an appliance. Its versatility makes it an ideal choice for such automation projects.
Relay Module
A relay module is used to control high-voltage appliances safely using low-voltage signals from the Arduino. It acts as a switch, enabling or disabling the flow of electricity to the connected device based on the Arduino’s output.
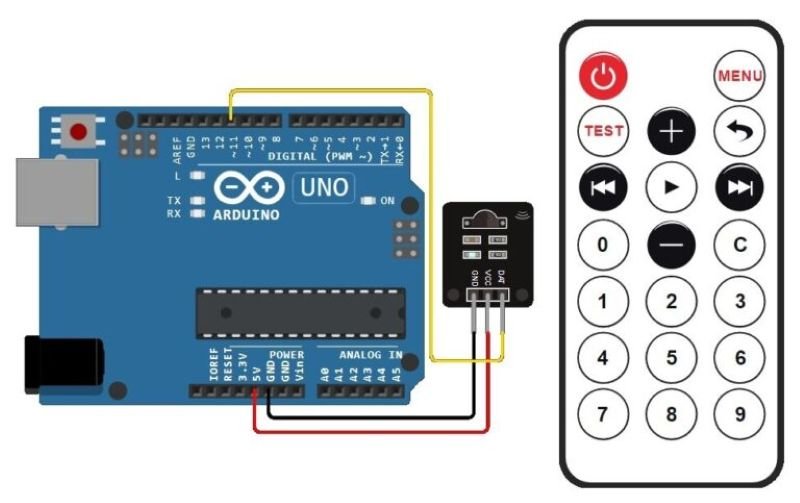
Circuit Diagram
Below is a description of how the components are connected:
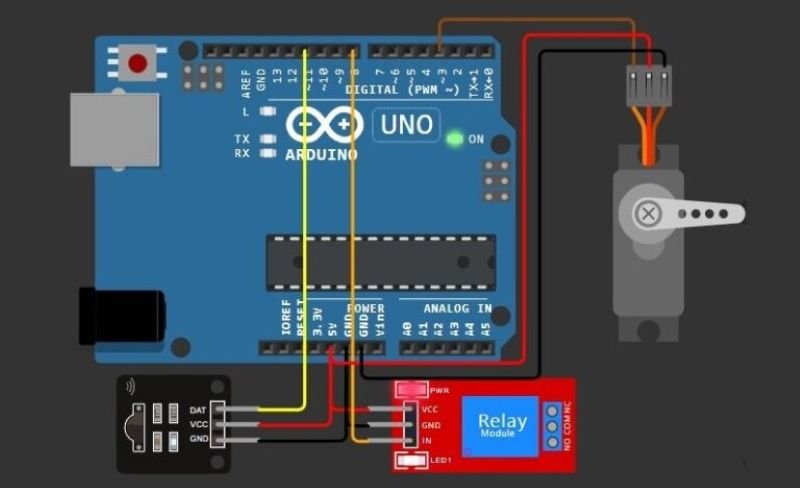
- IR Receiver to Arduino:
- VCC Pin: Connect to Arduino 5V.
- GND Pin: Connect to Arduino GND.
- OUT Pin: Connect to a digital pin on Arduino (e.g., Pin 11).
- Relay Module to Arduino:
- IN Pin: Connect to another digital pin on Arduino (e.g., Pin 8).
- VCC Pin: Connect to Arduino 5V.
- GND Pin: Connect to Arduino GND.
- Relay to Appliance:
- Connect the appliance to the relay’s Common and Normally Open terminals.
- Ensure proper insulation and wiring for safety.
- Power Connections:
- Power the Arduino via USB or a battery.
- Use an external power supply if required for high-power appliances.
Code Explanation
Step-by-Step Breakdown of the Arduino Code
- Include Libraries:
Use the IRremote library to process signals from the IR remote.
#include <IRremote.h>
Define Pins and Variables:
Assign pins for the IR receiver and relay. Create variables to store the decoded IR values.
const int RECV_PIN = 11; // IR receiver connected to pin 11
const int RELAY_PIN = 8; // Relay connected to pin 8
IRrecv irrecv(RECV_PIN);
decode_results results;
Setup Function:
Initialize the IR receiver and set the relay pin as an output.
void setup() {
Serial.begin(9600);
irrecv.enableIRIn(); // Start the IR receiver
pinMode(RELAY_PIN, OUTPUT);
}
Loop Function:
Continuously check for IR signals, decode them, and activate the relay based on the received code.
void loop() {
if (irrecv.decode(&results)) {
Serial.println(results.value, HEX); // Print IR code for debugging
if (results.value == 0xFF30CF) { // Replace with your IR button's code
digitalWrite(RELAY_PIN, HIGH); // Turn ON appliance
} else if (results.value == 0xFF18E7) { // Replace with another button's code
digitalWrite(RELAY_PIN, LOW); // Turn OFF appliance
}
irrecv.resume(); // Ready to receive the next signal
}
}
Explanation of Libraries
The IRremote library simplifies the process of decoding and using IR signals. Key functions include:
enableIRIn(): Activates the IR receiver.decode(&results): Decodes received IR signals.resume(): Prepares the receiver for the next signal.
Tips for Customization
- Map additional IR remote buttons to control multiple appliances.
- Use arrays to store codes for multiple appliances and iterate through them for more complex setups.
Step-by-Step Guide to Implementation
1. Wiring the Components
- Connect the IR receiver to the Arduino as per the circuit diagram.
- Wire the relay module to the Arduino and connect it to the appliance.
- Double-check connections to ensure they are secure and safe.
2. Uploading and Testing the Code
- Install the IRremote library in the Arduino IDE via the Library Manager.
- Copy the provided code into the IDE.
- Upload the code to the Arduino board using a USB cable.
3. Using the IR Remote to Control Appliances
- Press the buttons on the IR remote and monitor the serial output to identify button codes.
- Update the code with the correct IR codes for your remote.
- Test the setup by turning the appliance ON/OFF using the mapped buttons.
Applications
Practical Uses
- Lighting Systems: Control room lights remotely.
- Fans and Heaters: Adjust power or turn them ON/OFF without manual switches.
- Entertainment Devices: Manage TVs, projectors, or sound systems.
Potential Enhancements
- IoT Integration: Combine with Wi-Fi modules (e.g., ESP8266) to control appliances via the internet.
- Voice Control: Add voice command functionality using platforms like Alexa or Google Assistant.
Common Issues and Troubleshooting
- IR Remote Signal Not Being Detected
- Ensure the IR receiver is connected properly.
- Check for loose connections and verify the pin assignment in the code.
- Confirm that the IR remote has working batteries.
- Relays Not Switching Correctly
- Verify the relay connections and ensure the relay module is compatible with your appliance’s power rating.
- Test the relay with a simple LED to ensure it works.
- General Debugging Tips
- Use the Arduino serial monitor to verify the IR codes received.
- Add debug messages in the code to track the system’s behavior.
- If the relay clicks but the appliance doesn’t respond, check the wiring to the appliance.
Conclusion
In conclusion, This project showcases a simple yet powerful way to control home appliances using an IR remote and Arduino. By leveraging the flexibility of Arduino and the IRremote library, you can create a tailored automation solution for various devices. The setup is beginner-friendly and can be expanded with advanced features like IoT connectivity or voice commands.
Start experimenting today, and transform your home into a smarter and more efficient space.
FAQs
1. Can I use any IR remote for this project?
Yes, most IR remotes work as long as their signals can be detected by the IR receiver. You’ll need to decode the specific button signals using the Arduino serial monitor.
2. What is the maximum range of the IR remote?
The range depends on the remote and the IR receiver. Typically, it’s around 5-10 meters in a clear line of sight.
3. Can I control multiple appliances with this setup?
Yes, by using a multi-channel relay module and mapping different IR codes to each appliance, you can control multiple devices.
4. What should I do if the relay clicks but the appliance doesn’t turn on?
Ensure the appliance is properly connected to the relay and the relay is rated for the appliance’s voltage and current requirements.
5. Can this project be integrated with other systems like Alexa or Google Assistant?
Yes, you can integrate it with IoT platforms using Wi-Fi modules like ESP8266 or ESP32 to add voice or app-based control.
