Building a Smart Garage Door Opener Using ESP32: IoT Projects
Garage doors can be cumbersome to open and close manually due to their weight and size. In the era of the Internet of Things (IoT), it is practical to automate and simplify this task. This article outlines the construction of a smart garage door opener using an ESP32 development board and the Arduino IDE, making the process as easy as a tap on your smartphone.
Components Required
To build the IoT-based garage door opener, the following components are necessary:
- NodeMCU ESP32
- 2 x SG90 Servo Motors
- Power Supply (5V adapter or power bank)
- Breadboard
- Jumper Wires
- Cardboard and chart papers for the garage model
The ESP32 Development Board
The NodeMCU ESP32 is a powerful and low-cost microcontroller, ideal for IoT projects due to its WiFi capability. The SG90 servo motors are used for the lifting mechanism. These small, cost-effective motors can rotate from 0 to 180 degrees, providing sufficient torque to handle the garage door’s movement.
Circuit Diagram
The circuit for this project is straightforward. Connect the VCC pin of both servo motors to the VIN pin of the ESP32, the GND pins to the GND on the ESP32, and the PWM pins of the servos to D13 and D12 on the ESP32. Ensure the system is supplied with no more than 6V to avoid damaging the servo motors.
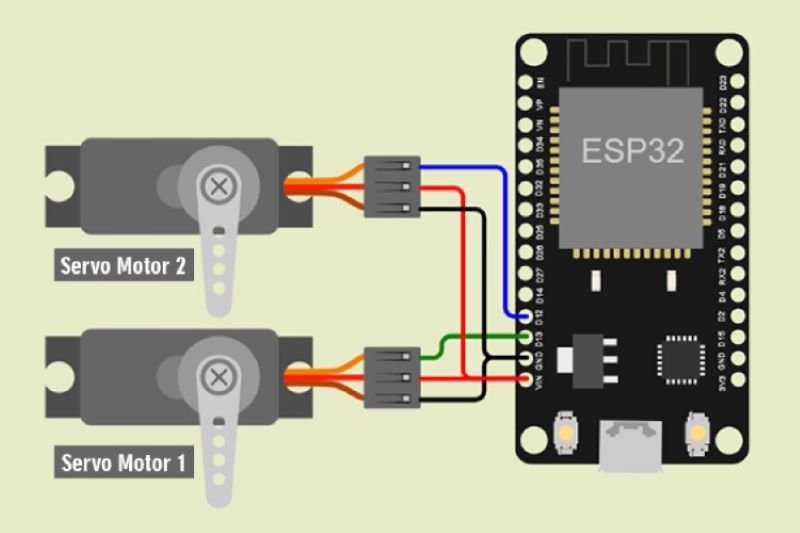
| 1st Servo Motor(SG90) | NodeMCU ESP32 |
|---|---|
| VCC (Red Wire) | VIN |
| PWM (Yellow Wire) | D13 |
| GND (Brown Wire) | GND |
| 2nd Servo Motor (SG90) | NodeMCU ESP32 |
|---|---|
| VCC (Red Wire) | VIN |
| PWM (Yellow Wire) | D12 |
| GND (Brown Wire) | GND |
Assembly and Setup
After assembling the electronics, construct a model garage using cardboard and chart papers. Mount the servo motors inside the garage doors and secure the breadboard circuit setup using double-sided tape and transparent tape for the wires.
Programming the ESP32
The programming involves two main tasks: controlling the servos and setting up a web server to operate the garage door via a smartphone.
#include <ESP32Servo.h>
#include <WiFi.h>
Variables and WiFi Setup
Define variables for the servos and WiFi credentials:
Servo servo1;
Servo servo2;
const char* ssid = "your-ssid";
const char* password = "your-password";
int pos = 0;
WiFiServer server(80);
String header;
String doorstate = "off";
Setup Function
In the setup() function, initialize the servos, start the serial communication for debugging, and connect to the WiFi network.
void setup() {
  servo1.attach(15);
  servo2.attach(13);
  Serial.begin(115200);
  WiFi.begin(ssid, password);
  while (WiFi.status() != WL_CONNECTED) {
    delay(500);
  }
  server.begin();
  Serial.println(WiFi.localIP());
}
Loop Function
The loop() function continuously listens for incoming client connections and processes commands to open or close the garage door.
void loop() {
  WiFiClient client = server.available();
  if (client) {
    String currentLine = "";
    while (client.connected()) {
      if (client.available()) {
        char c = client.read();
        header += c;
        if (c == '\n') {
          if (currentLine.length() == 0) {
            client.println("HTTP/1.1 200 OK");
            client.println("Content-type:text/html");
            client.println("Connection: close");
            client.println();
            if (header.indexOf("GET /door/on") >= 0) {
              doorstate = "on";
              while (pos < 100) {
                servo1.write(pos);
                servo2.write(180 - pos);
                pos++;
                delay(10);
              }
            } else if (header.indexOf("GET /door/off") >= 0) {
              doorstate = "off";
              while (pos > 0) {
                servo1.write(pos);
                servo2.write(180 - pos);
                pos--;
                delay(10);
              }
            }
            client.println("<!DOCTYPE html><html>");
            client.println("<head><meta name=\"viewport\" content=\"width=device-width, initial-scale=1\">");
            client.println("<link rel=\"icon\" href=\"data:,\">");
            client.println("<style>html { font-family: Times New Roman; display: inline-block; margin: 0px auto; text-align: center;}");
            client.println(".button { background-color: #195B6A; border: none; border-radius: 50%; color: white; padding: 16px 40px;");
            client.println("text-decoration: none; font-size: 30px; margin: 2px; cursor: pointer;}");
            client.println(".button2 {background-color: #77878A;}</style></head>");
            client.println("<body><h1>IoT Based Garage Door</h1>");
            if (doorstate == "off") {
              client.println("<p><a href=\"/door/on\"><button class=\"button\">Open</button></a></p>");
            } else {
              client.println("<p><a href=\"/door/off\"><button class=\"button button2\">Close</button></a></p>");
            }
            client.println("</body></html>");
            client.println();
            break;
          } else {
            currentLine = "";
          }
        } else if (c != '\r') {
          currentLine += c;
        }
      }
    }
    header = "";
    client.stop();
  }
}
Testing and Operation
Power the project using a power bank or a suitable power supply. Connect your smartphone to the same WiFi network and enter the IP address of the ESP32 in your browser. The webpage will display buttons to open or close the garage door. Add this webpage to your home screen for quick access.
Conclusion
In conclusion, Building an IoT-based smart garage door opener using an ESP32 board and servo motors is a practical and educational project. It not only automates a mundane task but also introduces the basics of IoT and web server programming. With this project, you can control your garage door effortlessly using your smartphone.